
Local DNS Server for Demos
I've been making a lot of Demos and proofs of concept with my laptop over the last years using virtualised servers, kubernetes, LXC, dockers and other different environments. Some time ago, I used to set the appropriate name/ip entries in /etc/hosts, but that isn't a good solution.

I realised my /etc/hostsfile was growing bigger an bigger every day and I realised that entries were growing older and older everyday. When I created a new Virtual server, I had to replicate the hosts entries in my Virtual servers so that they could talk each other using the name instead of the IP.
I had to get this fixed once and forever: I needed a DNS Server.
In this article, I'll explain the reasons to deploy a DNS server, which one I like to use, how to install and configure it and, at the end, I'll a very easy demo where I'll deploy a new Ubuntu Virtual server which can be accessed using its name by ssh (using DNS) and I'll will deploy a mini-kubernetes (K3S). In the K3S I'll deploy a nginx web server as a service and I'll set an Ingress entry, so it can be clear that we can access the web server content using our local web browser.
Advantages of local DNS server
Consistent local names for my local testing domains
Yes, I want to have a domain name like "jicg.mine" and as many subdomains in that domain as I can imagine. So, I configure my own domain name and... voilà, I can set up all the names I need, all I the names I want. If I use my own DNS server as the default one in my laptop, then all my virtual servers, my kubernetes clusters or my dockers will use this DNS and the server names will be consistent among them all. No more extra work than setting the names in the DNS server once.
Please, note that the top level domain name .local is a special-use domain reserved and it might not be a good idea to use it. You can check all the special-use domains in wikipedia.
Centralised Hosts File Management
As I described in the introduction, the /etc/hostsfile easily becomes messy and unmaintainable. The host file, even though seems to be an easy solution at first, has its limitations. Imagine you need a set of names like *.demo.jicg.mine (I'll use it late since it is very comfortable for defining Ingress entries), you'll struggle writing entries in all the /etc/hostsfiles across your demo infrastructure. It is simply a bad idea. To sum up, modifying /etc/hosts is both a messy and a poor solution.
Using a DNS nameserver is really a nice solution to keep things under control for the demo or all your infrastructure.
What interface should DNS server should listen?
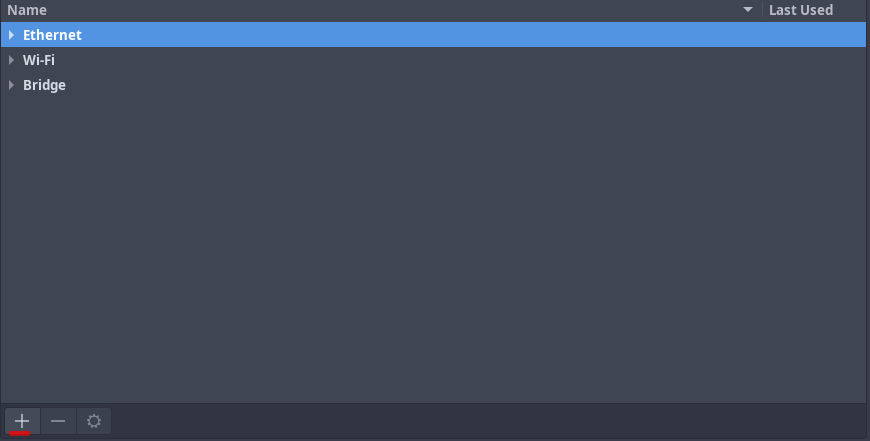
It is easy to see that, in my laptop I have several DNS servers installed since I use LXC or Libvirt:

So, 0.0.0.0 is not the right place to set the DNS listening socket. And as I want it to be accessible from virtual servers, kubernetes deployments, and from everywhere, I can't set it up in 127.0.0.1.
My solution was creating a new local interface. I created a new bridge.
Most Linux desktop systems today use NetworkManager, which has a graphical configuration tool. So, in order to create a new persistent network interface in my laptop which I will use from every virtual server I created a new bridge interface using my graphical interface:
You'll be requested to select the type of interface you want to create, and in my case I used bridge, I pressed create and filled the info required under bridge:
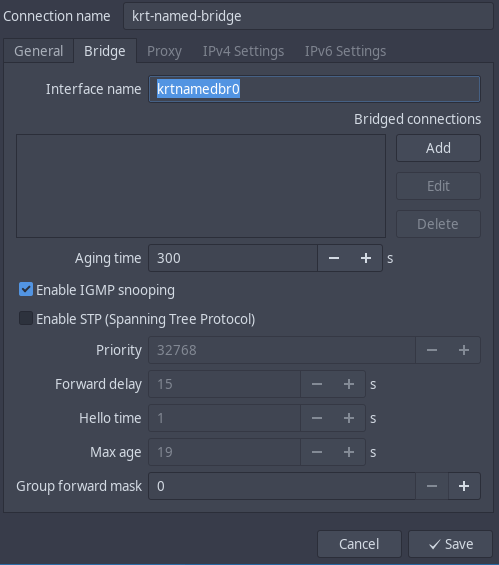
In this bridge you won't probably need to enable the stp. We won't have so many bridges nor such a complex network deployment that might cause loops in the simulated network. However it won't harm if you activate it.
Under "IPv4 Settings" I wrote the IPv4 configuration (no IPv6 used in my case):
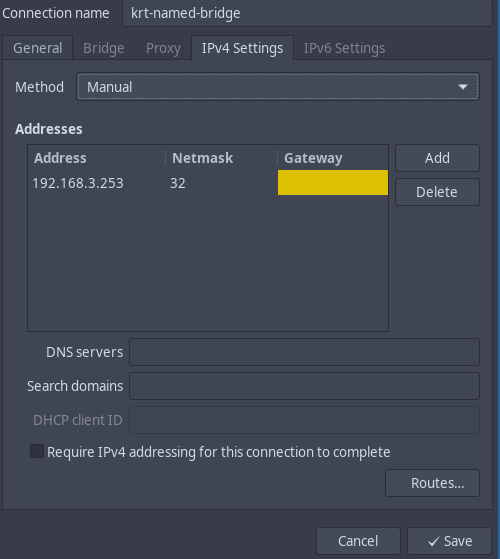
And yes, a /32 is enough. I don't need a full network here. I simply need an IP. Nothing else. So, yes it is not a mistake it is only what I need.
Bind installation and configuration
I feel comfortable with bind9and named. So I decided to install it in my laptop. You can probably do it with a local corednsor dnsmasq (although dnsmasq has also its limitations). Anyway, I am comfortable with bind, so that will be my choice.
If you don't know much about bind, you'll realise I write about named and bind mixing them as I didn't know what software to use. To clarify, bindis the software suite and namedis the name server provided (the daemon). After the clarification, Let's install it:
# In Archlinux:
sudo pacman -S bind

# Enable named for next restarts
sudo systemctl enable named

# Start named
sudo systemctl start named
It can also be deployed in Ubuntu. There will be no need to enable and start manually the service. Ubuntu does this for you. So, the installation is simply like this:
sudo apt install -y bind9Not it is time for the configuration of the named server, And yes, they have different places to configure things, but they are basically the same. In Arch Linux it is /etc/named.conf and all the files in the directory /etc/named, whilst in Ubuntu it is /etc/bind/named.conf and the files in /etc/bind. The configuration is basically done the same way. Let's start setting the options:
options {
	listen-on-v6 port 53 {  none;  };

    # Listen on... the bridge we previously created.
	listen-on port 53 { 192.168.3.253; };
	directory 	"/var/named";
	dump-file 	"/var/named/data/cache_dump.db";
	statistics-file "/var/named/data/named_stats.txt";
	memstatistics-file "/var/named/data/named_mem_stats.txt";
	recursing-file  "/var/named/data/named.recursing";
	secroots-file   "/var/named/data/named.secroots";

	recursion yes;

    # If the name is not local, query other DNSs
	forwarders {
                8.8.8.8;
                8.8.4.4;
        };

	# dnssec-enable yes;
	dnssec-validation yes;

	/* Path to ISC DLV key */
	bindkeys-file "/etc/named.root.key";

	managed-keys-directory "/var/named/dynamic";

	pid-file "/run/named/named.pid";
	session-keyfile "/run/named/session.key";
};
excerpt from /etc/named.conf (arch linux) or /etc/bind/named.conf.options (ubuntu)
This way, we'll configure the namedserver to listen
- Only in the IP 192.168.3.253
- Try to resolve the name for the clients by doing all the needed work, for example, querying other namerservers.
- forwarders - Use the nameservers (in this case google's nameservers) to find the right answer for the name.
Now, we'll need to change with the NetworkManager our network configurations in order to use our local DNS server as show in the following picture instead of those provided by our ISP provider:

Configure a new Zone (domain) in our server
Once everything is up and running, we can configure our 1st zone. I'll show the example for jicg.mine domain
- We have to edit
/etc/named/named.conf.localand add the lines:
zone "jicg.mine" {
    type master;
    file "/etc/named/zones/db.jicg.mine"; # zone file path
};
Define a new local Zone
- Create the file defined in the zone
/etc/named/zones/db.jicg.mine
$TTL 604801
@ IN SOA services.jicg.mine. admin.jicg.mine. (
2025112100 ; Serial
604800 ; Refresh
86400 ; Retry
2419200 ; Expire
604800 ; Negative Cache TTL
)
; name servers - NS records
IN NS services
services.jicg.mine. IN A 192.168.3.253
admin.jicg.mine. IN A 192.168.3.253
; name servers - A records
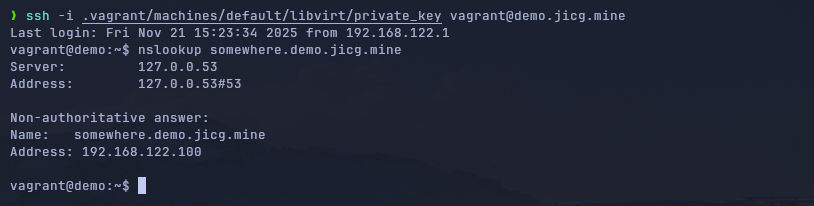
demo.jicg.mine. IN A 192.168.122.100
*.demo.jicg.mine. IN A 192.168.122.100And define the names and DNS configurations for the zone.
- Let's check if everything is correct using the
named-checkconfto test the configuration of named andnamed-checkzoneto check if the zone configuration is correct:

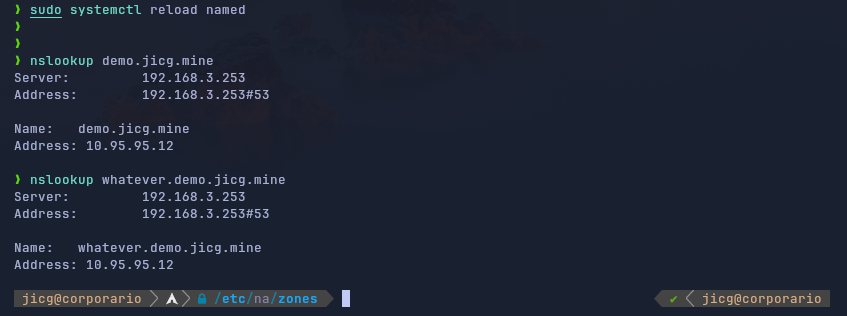
- Finally I could reload the daemon named
Test Use Case: Demo with Kubernetes Ingress
I want to access a server in Kubernetes using a name, for example, http://my-nginx.demo.jicg.mine.
I'll do all the process from the deployment of the Virtual server using vagrant with the libvirt provider – basically this consist deploying a new virtual server with a defined IP and I'll show the Vagrantfile used and the shell script used to install K3S when the server starts, no need to type almost anything but vagrant up.
In the second part, we'll deploy the kubernetes service and the Ingress entries that will configure the web site (yes, I know, it will be empty) to demonstrate how the DNS server helps us in this example scenario.
Deploy a new VM and install k3s kubernetes.
Vagrant is a very good tool to deploy new Virtual servers. It is not the fastest tool and it is not for production but it is very nice to create disposable virtual servers. I usually work with Vagrant and its libvirt plugin. So, in order to start my virtual server using Vagrant, I create a new directory named demo and I create 2 files: Vagrantfile and bootstrap.sh. The first one is to configure the new virtual server to boot and the other one is a bash-script to configure and install things.
Vagrant.configure("2") do |config|
  config.vm.box = "cloud-image/ubuntu-24.04"
  config.vm.provision :shell, path:"bootstrap.sh"

  config.vm.hostname = "demo.jicg.mine"
  config.vm.synced_folder './', '/vagrant', type: 'nfs', nfs_version: 4

  config.vm.provider "libvirt" do |vb|
    vb.machine_virtual_size = 50
    vb.memory = "8192"
    vb.cpus = 4
    vb.nested = true
  end

  config.vm.network :private_network,
    libvirt__mac: "52:54:00:bd:ba:98",
    ip: "192.168.122.100",
    type: "dhcp",
    libvirt__network_name: "default"

end
Vagrantfile: To configure the newly created VM
#!/bin/bash

## Update the VM and install some tools I like to have
sudo apt update -y
sudo apt -y install git curl wget ripgrep fzf jq

## Install k3s
curl -sfL https://get.k3s.io | sh -

# Configure the k3s service, setting the node ip to the one used in our demo
sed -i 's/server \\/server --node-ip 192.168.122.100 --node-external-ip 192.168.122.100/g' /etc/systemd/system/k3s.service

# Reload systenctl after the changes in the service
systemctl daemon-reload

# Reload the service itself
systemctl restart k3s

# Set the bash shell for vagrant (by default it is /bin/sh)
chsh -s /bin/bash vagrant

# Add the corresponding permissions to vagrant so it can use kubernetes
chgrp vagrant /etc/rancher/k3s/k3s.yaml
chmod g+r /etc/rancher/k3s/k3s.yaml
bootstrap.sh - To Install k3s
We run the vagrant upcommand in order to start the installation of our Virtual Server and after some time, everything would have ended and we'll be able to ssh the VM and use Kubernetes:
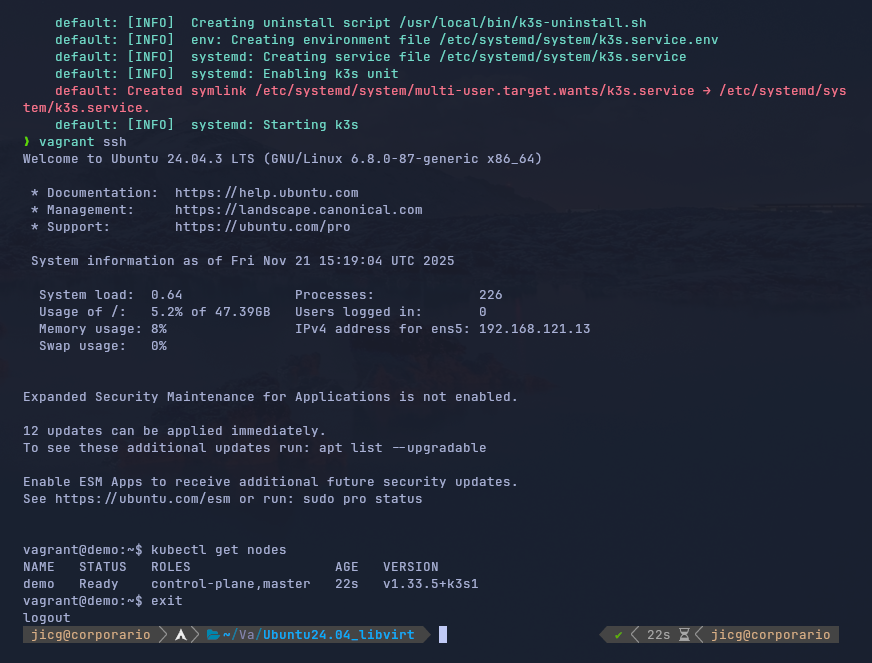
Or even we could login using the name in the DNS. Of course, we'll have to use the private key generated by Vagrant, but it is absolutely feasible.
Deploy the Ingress service
One of the easiest thing we can deploy in kubernetes to demonstrate Ingress is an nginx service. I'll create both a Service for an nginx deployment and its Ingress.
# Apply the Deployment and the Service for the nginx
kubectl apply -f https://raw.githubusercontent.com/jicarretero/jicgeu-support/refs/heads/master/OtherExamples/2025/11/localDnsDemo/nginx.yaml

# Apply Ingress for nginx
kubectl apply -f https://raw.githubusercontent.com/jicarretero/jicgeu-support/refs/heads/master/OtherExamples/2025/11/localDnsDemo/nginx-ingress.yaml
Apply yaml files to create an nginx service and its ingress.
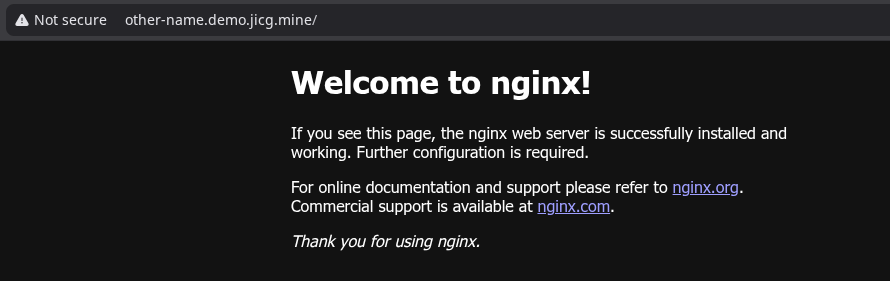
If you read carefully the ingress file, you can see these 2 lines:
  rules:
    - host: my-nginx.demo.jicg.mine
It means that when an HTTP request comes for http://my-nginx.demo.jicg.mine, it will be mapped to the nginx service:

And the valid name is that one and no other name. It is the only one that will be mapped to the service:

If we wanted this last name to work, I need to apply a manifest to create an Ingress entry for that new name, mapping it to the nginx service -
apiVersion: networking.k8s.io/v1
kind: Ingress
metadata:
  name: nginx
spec:
  rules:
    - host: other-name.demo.jicg.mine
      http:
        paths:
          - path: /
            pathType: Prefix
            backend:
              service:
                name: nginx
                port:
                  number: 80
New file - other-name-ingress.yaml
Then run kubectl apply -f other-name-ingress.yaml and... we've go it.
Again, in this case, we'll have 2 names and only these 2 names. I don't think I need more. Well, I think I have one too many.
Last Word
In production environments, there is no doubt that a DNS name server is really important, but for local demos and learning I really value what a DNS server can do for my demos. I will be able to create new entries to map our desired names to IPs to different services. I will be able to access the different servers with ssh using names instead of remembering IP addresses, create web services accessible by their names, etc.
Yes, it might be a bit difficult at first, however, the effort is quickly paid off.