
OpenTofu (Terraform) and libvirt
A month ago I wrote an article about Vagrant and libvirt where it was described how to deploy and use new servers quickly and how to install the software needed just as the server starts using both bash scripts and Ansible. It is quite easy and useful, however, Vagrant is only intended for development and demos. In this article it is also described how to install libvirt and qemu-kvm.
Another great tool for keeping your infrastructure as code is OpenTofu, which is a drop-in replacement for Terraform. I will use the words Terraform, OpenTofu, tofu as synonyms.
What will do in this tutorial?
Basically the idea is creating a new local Ubuntu 24.04 virtual server using OpenTofu and the HCL (Hashicorp Configuration Language) to describe our virtual server.
- We'll use the libvirt provider to deploy it in qemu-kvm.
- We'll configure our server using cloud-init to have
- A hostname
- An user (named ubuntu) accessible by ssh
- Install some software packages and a small and lightweight k3s kubernetes distribution to demonstrate that we can do some setups here.
Installation
qemu+livirt
Installation description of libvirt and qemu are everywhere in the internet for your Linux distribution, a simple search and you'll find tons of installations, anyway, I show here how to install it for Arch Linux and Ubuntu, but for sure you can find better installation tutorials around.
#
source /etc/lsb-release

case $DISTRIB_ID in
"Arch")
  sudo pacman -Suy --noconfirm qemu libvirt virt-manager ebtables dnsmasq bridge-utils
  ;;
"Ubuntu")
  sudo apt update -y
  sudo apt install -y qemu-system libvirt-daemon virt-manager
  ;;
esac

# Yes... we should check that it installed... but it is irrelevant here.
sudo systemctl enable libvirtd
sudo systemctl start libvirtd
OpenTofu
In Ubuntu 24.04 we can install OpenTofu using the following commands:
# Install packages needed to reliable add new repos to the system
sudo apt update
sudo apt install -y curl gnupg apt-transport-https ca-certificates

# Add tofu repo
curl -fsSL https://get.opentofu.org/opentofu.gpg | sudo gpg --dearmor -o /etc/apt/trusted.gpg.d/opentofu.gpg
curl -fsSL https://packages.opentofu.org/opentofu/tofu/gpgkey | sudo gpg --dearmor -o /etc/apt/trusted.gpg.d/tofu.gpg

echo "deb https://packages.opentofu.org/opentofu/tofu/any/ any main"|sudo tee /etc/apt/sources.list.d/opentofu.list

# Install OpenTofu
sudo apt update
sudo apt install tofu
I use Arch Linux btw, so the installation goes as folows
sudo pacman -S opentofuMy libvirt pool configuration.
A libvirt pool is a storage location (directories in this case) where libvirt stores virtual machine disk images, ISO files, and other storage volumes.
I usually have (at least) 3 different pools in order to use my libvirt installation:
- The default pool (the one I have by default for libvirt).
- The cloud-init-pool pool, where I put all the cloud-init generated ISO images (we'll talk about this later).
- The base-image-pool pool, where I put my base images, this means the qcow2 base images that I will use for different purposes. In this article I will only show about Ubuntu-24.04, but I have some others like Almalinux-9.
Defining the pools (using HCL)
I don't create my "stable" pools this way, I always do it using libvirt. But only for my "stable" pools. We could create a separate directory to work with pools:
mkdir my-pools
cd my-pools
Then write a main.tf file:
terraform {
  required_providers {
    libvirt = {
      source  = "multani/libvirt"
      version = "0.6.3-1+4"
    }
  }
}

// Connect to local libvirt
provider "libvirt" {
  uri = "qemu:///system"
}

resource "libvirt_pool" "base-image-pool" {
  name = "base-image-pool"
  type = "dir"
  path = "/data/libvirt/base-image-pool"
}
resource "libvirt_pool" "cloud-init-pool" {
  name = "cloud-init-pool"
  type = "dir"
  path = "/data/libvirt/cloud-init-pool"
}
main.tf file (only for pools)
And run the commands:
tofu init
tofu apply
I do this in separate directory (different OpenTofu) deployments because I don't want the pools (and its data) to be removed when I run tofu destroy. I want these pools to be there forever, for all my installations. This is basically the reason why I've defined my pools using the libvirt-way.
Defining the pools (the libvirt-way)
I did this once and forever in my installation using libvirt. You can skip this section if you only care about Terraform things.
# Create the directories

mkdir -p /data/libvirt/base-image-pool
mkdir -p /data/libvirt/cloud-init-pool
Once I have the directories, I create both xml files, one to describe the base-image-pool and the other one to define the base-image-pool:
# base-image-pool.xml file
<pool type='dir'>
<name>base-image-pool</name>
<target>
<path>/data/libvirt/base-image-pool</path>
<permissions>
      <mode>0755</mode>
      <owner>0</owner>
      <group>0</group>
    </permissions>
</target>
</pool>
base-image-pool.xml
And other one to define the cloud-init-pool:
# cloud-init-pool.xml file
<pool type='dir'>
<name>base-image-pool</name>
<target>
<path>/data/libvirt/cloud-init-pool</path>
<permissions>
      <mode>0755</mode>
      <owner>0</owner>
      <group>0</group>
    </permissions>
</target>
</pool>
And I create the pools:
# Define pools according to the files:
virsh pool-define cloud-init-pool.xml
virsh pool-define base-image-pool.xml

# Start the new defined pools
virsh pool-start cloud-init-pool
virsh pool-start base-image-pool

# Set the autostart flag to the pools, so they start after rebooting.
virsh pool-autostart cloud-init-pool
virsh pool-autostart base-image-pool
Download a base image to work with
The next step (it doesn't matter how you created the pools) will be downloading an Ubuntu 24.04 image from the official Ubuntu cloud-image repository:
wget -O /data/libvirt/base-image-pool/ubuntu-24.04-base-x.qcow2 \
  https://cloud-images.ubuntu.com/noble/current/noble-server-cloudimg-amd64.img

# Refresh, specially the newly downloaded image to the pool
virsh pool-refresh base-image-pool
Now we can check the files in the pool virsh vol-list --pool base-image-pool:

First VM
I always have the alias terraform because I was used to type that instead of tofu so I prevent mistakes this way (shame on me).
alias terraform='tofu'The provider that we'll use is multani/libvirt. It is well documented, so it is always the best reference.
Setting the provider
To set up the libvirt provider, we'll write in the file main.tf as the first few lines the following ones:
/*
The following lines sets the provider to use for our HCL deployment

This defines a connection to libvirt
*/
terraform {
  required_providers {
    libvirt = {
      source  = "multani/libvirt"
      version = "0.6.3-1+4"
    }
  }
}

// Connect to local libvirt
provider "libvirt" {
  uri = "qemu:///system"

  // We could also connect to a remote libvirt server:
  // uri = qemu+ssh://user@remote_host/system
}
main.tf
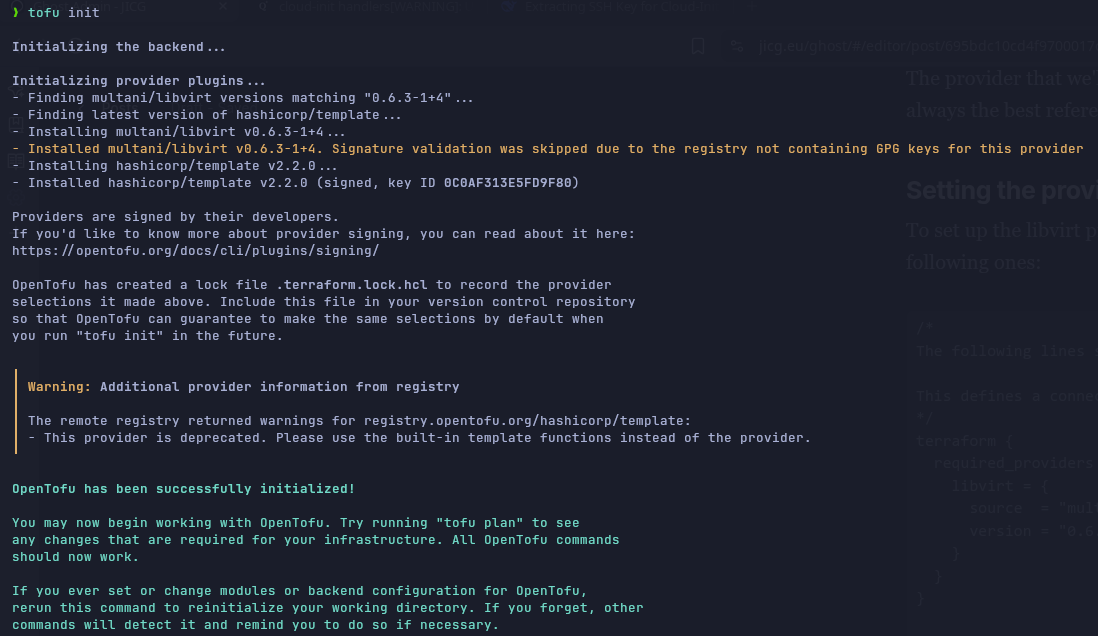
If we run tofu init , we download the provider (this step can be done later, at any time before running tofu plan or tofu apply):
Setup the VM (domain) features
In libvirt, we call the VMs domains. So, in this case we'll define a domain. Basically, and as always, we'll have to define:
- Volume base image and the size of the volume (how may HD gigabytes do we need?)
- RAM size
- Network to use (in this first example, I'll use the default network).
- Initial configuration of the VM (cloud-init).
/*
The following lines sets the provider to use for our HCL deployment

This defines a connection to libvirt
*/
terraform {
  required_providers {
    libvirt = {
      source  = "multani/libvirt"
      version = "0.6.3-1+4"
    }
  }
}

// Connect to local libvirt
provider "libvirt" {
  uri = "qemu:///system"
}

/****************
 *
 * Defining VM Volume
 *
 ****************/
resource "libvirt_volume" "first_vm_volume" {
  // The next 2 lines defines the name of the volume and its pool
  name = "first_vm_volume"
  pool = "default"

  // The base image name and its pool
  base_volume_name = "ubuntu-24.04-base.qcow2"
  base_volume_pool = "base-image-pool"

  // Disk format qcow2
  format = "qcow2"

  // Size - ~ 25Gb
  size = 25 * 1024 * 1024 * 1024
}

/****************
 *
 * Defining cloud-init file
 *
 ****************/
locals {
  // I will use my id_rsa.pub file. I will load it from the file
  ssh_public_key = file(pathexpand("~/.ssh/id_rsa.pub"))
}

data "template_file" "cloud_init_data" {
  // I define 2 variables:
  // - hostname - which sets the hostname in the VM
  // - ssh_public_key - Loaded in previous step from file
  vars = {
    hostname       = "firstvm"
    ssh_public_key = local.ssh_public_key
  }

  // I define the template file cloud_init.cfg
  template = file("${path.module}/cloud_init.cfg")
}

resource "libvirt_cloudinit_disk" "first_vm_cloudinit" {
  // Finally create the cloud-init iso file. With its name in the
  // cloud-init-pool
  name = "first_vm_cloudinit.iso"
  pool = "cloud-init-pool"

  // The data to create the iso file is the data rendered from
  // from what it is defined in the previous step
  user_data = data.template_file.cloud_init_data.rendered
}


/****************
 *
 * Defining the domain
 *
 ****************/
resource "libvirt_domain" "ubuntu-2404-first-vm" {
  name   = "first-vm" //  name of the server
  memory = "2048"     // RAM memory in MB
  vcpu   = 2          // Number of virtual CPUs

  // The network in the default network
  network_interface {
    network_name = "default"
  }

  // The disk, defined above
  disk {
    volume_id = libvirt_volume.first_vm_volume.id
  }

  // The CPU mode - I like host-passthrough
  cpu = {
    mode = "host-passthrough"
  }

  // The cloud-init defined above
  cloudinit = libvirt_cloudinit_disk.first_vm_cloudinit.id

  // A couple of configurations related to the console
  console {
    type        = "pty"
    target_type = "serial"
    target_port = "0"
  }

  // And the graphics - Although in this case I won't install any
  // graphical interface
  graphics {
    type        = "spice"
    listen_type = "address"
    autoport    = true
  }
}
main.tf full file
Regarding the file cloud_init.cfg, in this first case I will have this file:
#cloud-config
# vim: syntax=yaml
#

hostname: ${hostname}
manage_etc_hosts: false
ssh_pwauth: true
users:
  - name: ubuntu
    ssh_authorized_keys:
      - ${ssh_public_key}
    lock_passwd: false
    # the password is generated using: mkpasswd -m sha-512 "1234"
    passwd: $6$.NO1xMXBmPli7nXx$flG9pE.4yUaMKSIQ8w7yXWpxkXxXrfW7eUH7zTIT4wYR2WeVuV/14NEfPJqfwnI/BSjRt/DEn6eDcU8laaZ6Q1
    sudo: ['ALL=(ALL) NOPASSWD:ALL']
    shell: /bin/bash
    groups: wheel

disable_root: false
package_update: true
package_upgrade: true
# Install some packages I like to have
packages:
  - curl
  - wget
  - jq
  - tmux
  - ripgrep
# Run sume commands. For example, installing k3s
runcmd:
  - curl -sfL https://get.k3s.io | sh -
  - systemctl daemon-reload
  - systemctl restart k3s
  - chgrp ubuntu /etc/rancher/k3s/k3s.yaml
  - chmod g+r /etc/rancher/k3s/k3s.yaml
cloud_init.cfg
When the VM boots, it will install a few packages (curl, jq, ripgrep, etc.) and it will run some commands that will install k3s in the system. It will also create the user ubuntu accessible using my id_rsa key.
Starting the VM
Having previously run terraform init, we can run the command
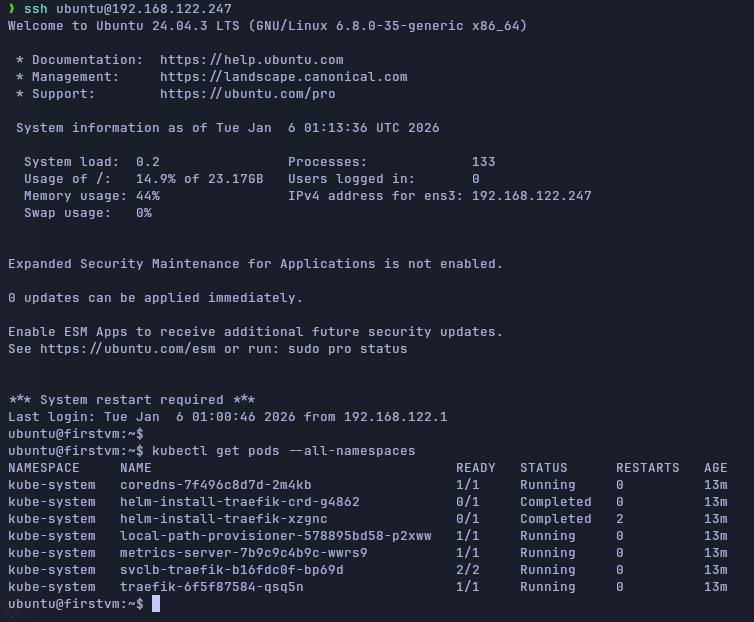
terraform applyAnd after confirming the plan that OpenTofu will use, (typing yes), the VM will be deployed. We can run virsh list to see that it is running, and we can run virsh net-dhcp-leases default to find our VM IPv4.

Of course, we can ssh our VM and check that the installation of k3s has been done with the commands in our `cloud_init.cfg` file.
Last word
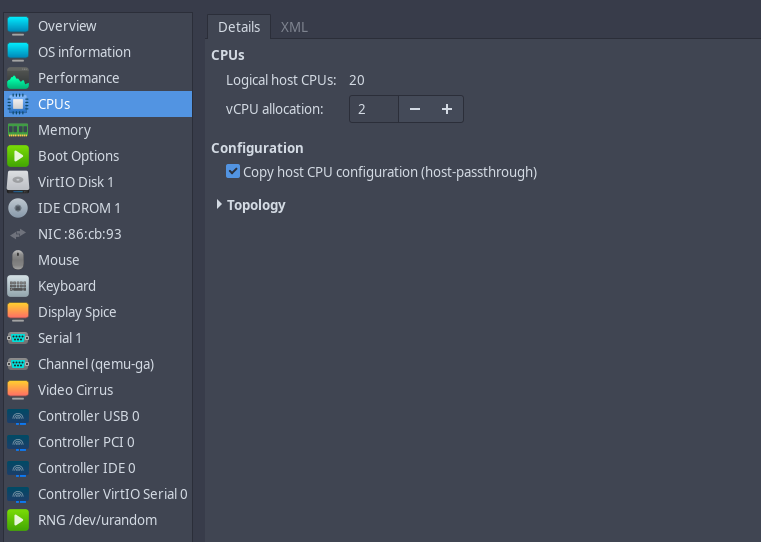
If we see in virt-manager the VM we have deployed using OpenTofu and libvirt we have a quite good configuration by default:
Virtio Hardware by default for both the network interfaces and the disks (we don't need to tweak anything at all), providing the best performance we can get thanks to para-virtualisation instead of full-virtualisation.
Regarding the CPU, I set the host-passthroughmode in the configuration file. It is the most performant and fastest mode. We won't be able to do live migrations of the server in the cloud. This is another long story to discuss somewhere else. In any case, I don't need live migrations today.