
Vagrant: libvirt plugin
Vagrant is a developer tool created by HashiCorp. And I mean it is a developer tool not intended for production. However, It is a fantastic tool which teaches a lot about deploying virtual servers, configuring them, using virtual infrastructure, etc.
I've been using Vagrant since quite a few years ago. It is that easy to create new virtual machines and configuring them the way I need. And yes, I admit that once I was stuck to Virtual Box for some years, even if I knew that KVM is much more performant than Virtual Box. However, I’ve been using the Vagrant libvirt plugin for over a year and I rid off Virtual Box.
The main reason to use Virtual box instead of libvirt is that Virtual box is really portable. It will work on Linux but it will also work in Windows or Mac OS. This is my best reason to use this default provider for Vagrant. However, I don't work with windows, nor with MacOS so let's go with libvirt and KVM.
The vagrant-libvirt plugin has a very nice and complete documentation: https://vagrant-libvirt.github.io/vagrant-libvirt/configuration.html
Installation pre-requisites
Of course, we'll need to install vagrant and all the needed virtualization stuff in our Linux system. It will be easy for you to find a good installation guide for qemu-kvm, libvirt and vagrant for your operating system.
In Ubuntu we could simple run (... and yes, I know it could be more fine grained):
sudo apt install -y qemu-system libvirt-daemon virt-manager

sudo systemctl enable libvirtd
sudo systemctl start libvirtd
libvirt + qemu installation Ubuntu
And the Vagrant installation goes this way
#
wget -O- https://apt.releases.hashicorp.com/gpg | sudo gpg --dearmor | sudo tee /usr/share/keyrings/hashicorp-archive-keyring.gpg > /dev/null

echo "deb [signed-by=/usr/share/keyrings/hashicorp-archive-keyring.gpg] https://apt.releases.hashicorp.com $(lsb_release -cs) main" | sudo tee /etc/apt/sources.list.d/hashicorp.list

sudo apt update && sudo apt install vagrant
Vagrant Installation Ubuntu
In arch-linux we'll need to install vagrant using yay or paru or something simular after installing libvirt and qemu
sudo pacman -S qemu libvirt virt-manager ebtables dnsmasq bridge-utils

sudo systemctl enable libvirtd
sudo systemctl start libvirtd

# Install Vagrant
yay -S vagrant
Vagrant with libvirt and qemu installation in Arch Linux
In both systems it is interesting to add your user to the libvirt and kvm groups:
sudo usermod -aG libvirt $(whoami)
sudo usermod -aG kvm $(whoami)
And log out and in again.
Install the vagrant-libvirt plugin
Using Ubuntu 24.04
If you are using Ubuntu, installing the Vagrant plugin in Ubuntu is really easy, you simple run:
# Well, we'll need to compile some things.
sudo apt install -y build-essential libvirt-dev

# And install the plugin itself.
vagrant plugin install vagrant-libvirt
Using Arch Linux
However, I am using Arch Linux and, after running that command, our plugin sadly won't work. The installation process was a bit more complicated. I need to manually install the gem:
git clone https://github.com/vagrant-libvirt/vagrant-libvirt.git

cd vagrant-libvirt
vim lib/vagrant-libvirt/driver.rb

## In a text editor (nano or vim), we remove the lines:
# > ip_command = %q( awk "/$mac/ {print \$1}" /proc/net/arp )
# > ...
# > libvirt_ip_command: ip_command,

## We build the Gem:
gem build

## And install it in Vagrant:
VAGRANT_DISABLE_STRICT_DEPENDENCY_ENFORCEMENT=1 vagrant plugin install ./vagrant-libvirt-*.gem
If those 2 lines are not removed, well get this error:

So, the changes in the driver.rbfile are as follow:
        # Get config options for Libvirt provider.
        config = @machine.provider_config
        uri = config.uri

-       # Setup command for retrieving IP address for newly created machine
-       # with some MAC address. Get it from dnsmasq leases table
-       ip_command = %q( awk "/$mac/ {print \$1}" /proc/net/arp )
-
        conn_attr = {
          provider: 'libvirt',
          libvirt_uri: uri,
-         libvirt_ip_command: ip_command,
        }
        conn_attr[:libvirt_username] = config.username if config.username
        conn_attr[:libvirt_password] = config.password if config.password
Using it: Creating a first VM.
In qemu-kvm there are 3 important things (to me) which are 1. setting up a virtio-network driver, 2. setting a virtio-disk driver and 3. host-passthrough the CPU (passing the host CPU model features, model, stepping, exactly to the guest). The first 2 ones are that way by default by vagrant-libvirt, and we'll only have to care for the last one.
$ cd vagrant/01-basic-ub2404-vm

$ # We need to be in the directory where the Vagranfile is:
$ ls
Vagrantfile

$
This first Vagrantfile goes like this:
Vagrant.configure("2") do |config|
  # The Vagrant-box to use (operating system image) - an ubuntu24.0 here.
  config.vm.box = "cloud-image/ubuntu-24.04"

  # Configurations for the Virtual server:
  config.vm.provider "libvirt" do |vb|

    # Disk 50 Gb
    vb.machine_virtual_size = 50

    # Memory 8Gb RAM
    vb.memory = "8192"

    # 4 cores/cpus
    vb.cpus = 4

    # Nested virtualization - yes (virtualization inside virtualization)
    vb.nested = true

    # We need to care this: host-passtrhough -- Copy our CPU Configurations
    vb.cpu_mode = "host-passthrough"
  end
end
Once defined, we can run vagrant up to start the new server and when the server is running, we can connect via ssh to the server with vagrant ssh.
We can stop the server with vagrant halt (we could start again the same server using again vagrant up) or we can destroy the server forever using vagrant destroy.
Simple and quick demo.
Configure the server as it boots.
Despite of configuring the server, we could take advantage and add the hostname configuration in the Vagrantfile.
We can add one line after config.vm.box = ... and before config.vm.provider like this:
# Set the hostname in the server:
config.vm.hostname = "demo-bootstrap"
Script to configure the Server
We can add a script which can be run as root when the VM starts. This script will install all the needed packages and make all the needed configurations to our virtual server as soon as it starts.
In my case, let's say I could be interested in booting a server running a small k3s kubernetes instance, which is quite easy to install. I also want the the default user vagrant to be able to use the k3s instance – I need to change the group of the configration file to vagrant.
So, the slightly modified Vagrantfile is:
Vagrant.configure("2") do |config|
  # The Vagrant-box to use (operating system image) - an ubuntu24.0 here.
  config.vm.box = "cloud-image/ubuntu-24.04"

  # Provision script: The script will be run as root when the VM starts
  config.vm.provision :shell, path:"bootstrap.sh"

  # Set the hostname in the server:
  config.vm.hostname = "demo-bootstrap"

  # Configurations for the Virtual server:
  config.vm.provider "libvirt" do |vb|

    # Disk 50 Gb
    vb.machine_virtual_size = 50

    # Memory 8Gb RAM
    vb.memory = "8192"

    # 4 cores/cpus
    vb.cpus = 4

    # Nested virtualization - yes (virtualization inside virtualization)
    vb.nested = true

    # We need to care this: host-passtrhough -- Copy our CPU Configurations
    vb.cpu_mode = "host-passthrough"
  end
end
And this is the bootstrap file
#!/bin/bash

# Install some desired packages
sudo apt update -y
sudo apt -y install git curl wget ripgrep fzf jq build-essential

# Install K3S
curl -sfL https://get.k3s.io | sh -

# I want the user Vagrant to use the shell bash (sh is the default one)
chsh -s /bin/bash vagrant

# Set the apropriate permissions to k3s configuration file for Vagrant user
chgrp vagrant /etc/rancher/k3s/k3s.yaml
chmod g+r /etc/rancher/k3s/k3s.yaml
bootstrap.sh configuration script
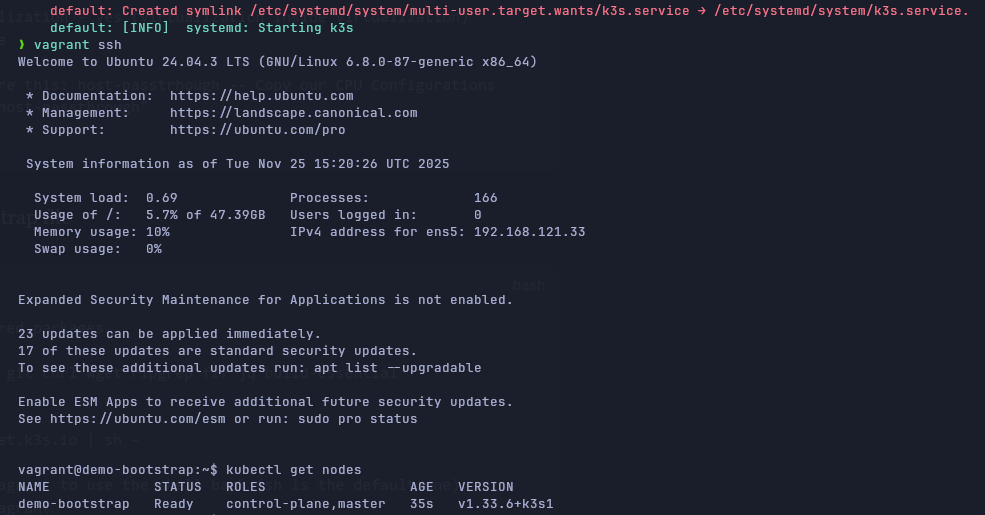
After configuring, we simply run the server with vagrant up — As we always do. It is installing software from Internet, so yes... we can expect long boot times. But when the VM is ready, we'll have a running version of kubernetes in a server named demo-bootstrap, as we can see in the picture.
Ansible to configure the server
Of course, you need to have ansible installed before trying to configure your virtual server with ansible. Vagrant makes use of a previously installed ansible in the system, but it doesn't install it.
The file tree configuration is as follows:

Of course, bear in mind that this is the simplest configuration we can do. Only 1 virtual server with a very simple playbook. We'll go deeper in this some day. In this case, even we don't have an inventory, vagrant is clever enough to know that our ansible inventory is all the servers.
The configuration of the Vagrantfile is basically the same as it was, the git diff with the previous one is shown here:
diff --git a/../02-install-script-vm/Vagrantfile b/Vagrantfile
index 72f7ac5..dbf08c2 100644
--- a/../02-install-script-vm/Vagrantfile
+++ b/Vagrantfile
@@ -2,12 +2,16 @@ Vagrant.configure("2") do |config|
   # The Vagrant-box to use (operating system image) - an ubuntu24.0 here.
   config.vm.box = "cloud-image/ubuntu-24.04"

-  # Provision script
-  config.vm.provision :shell, path:"bootstrap.sh"
-
     # Set the hostname in the server:
   config.vm.hostname = "demo-bootstrap"

+  # Provision ansible
+  config.vm.provision "ansible" do |ansible|
+    ansible.playbook = "playbook.yml"
+
+    # Just to have a lot of information on screen
+    ansible.verbose = "v"
+  end

   # Configurations for the Virtual server:
   config.vm.provider "libvirt" do |vb|
And the equivalent file playbook.yml to our bootstrap.sh is:
- name: Configure environment
hosts: all
become: true
vars:
package_list:
- git
- curl
- wget
- ripgrep
- fzf
- jq
tasks:
- name: Update apt package cache
apt:
update_cache: yes
- name: Install the packages in vars
apt:
name: "{{ package_list }}"
state: present
- name: Install K3S script
shell: |
curl -sfL https://get.k3s.io | sh -
- name: Change the group of the k3s.yaml file to vagrant
file:
path: /etc/rancher/k3s/k3s.yaml
group: vagrant
mode: g+r
- name: Change vagrant shell to bash instead of sh
user:
name: vagrant
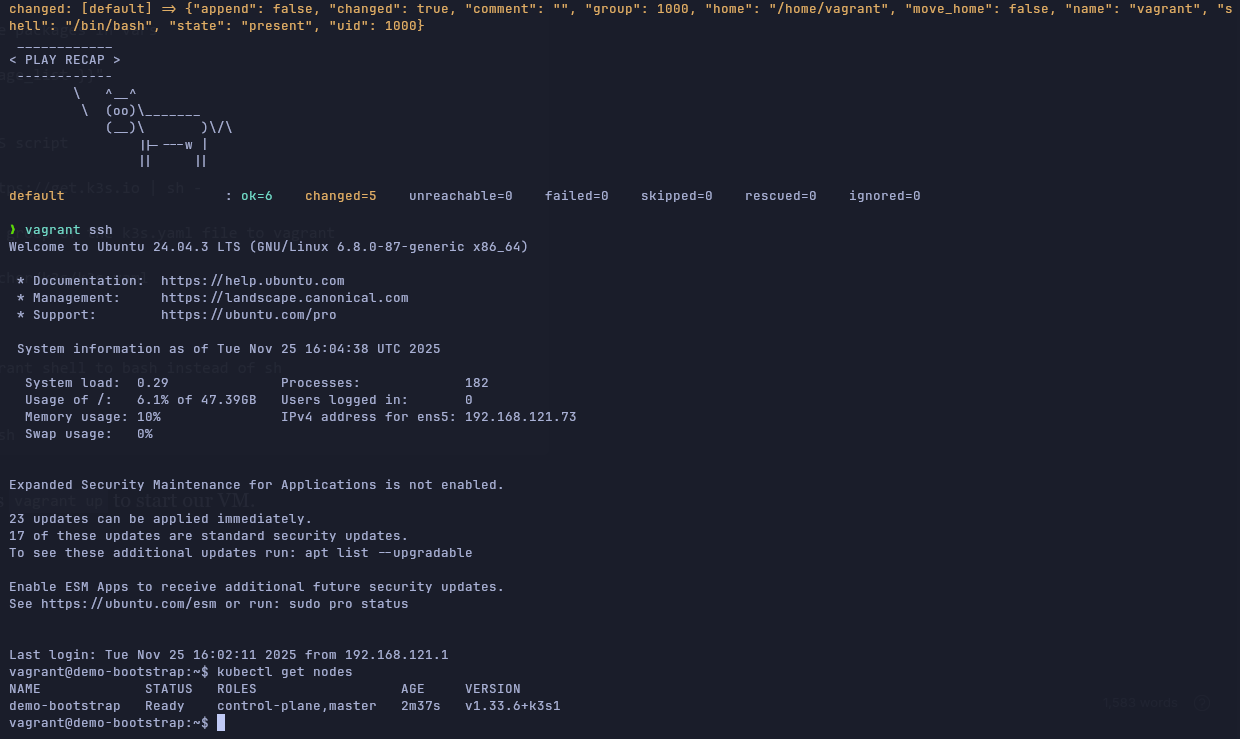
shell: /bin/bashWe can run, as always vagrant up to start our VM. When it is ready, ansible will have its magic done.
Networking
By default in libvirt, we have the network default. Usually bound to the bridge virbr0 and with CIDR 192.168.122.0/24. When we create a new server, it will be attached to this bridge device. However, if we use vagrant to create a new server, as we've explained in previous examples, a new network will be usually created - It will typically have CIDR 192.168.121.0/24 and it will be usually bound to the bridge virbr1.
After starting any of our Vagrant servers from our previous example, we will have these network configurations in libvirt. In the next example, we can see the networks defined in libvirt as well as the dhcp-leases that network has assigned. In my case, I have 2 virtual servers and each of the leases correspond to each one of the servers:

After destroying all servers, the network vagrant-libvirt will be destroyed.
Using the "default" network
We can use any other network we can think of. For example, let's start a server connected to our "default" network.
CAVEAT: When we destroy the last VM in the Vagrant network, it will be removed. So, in order to keep our network (default, vagrant-libvirt or whatever we use), we should add the line vb.management_network_keep = true to the Vagrantfile. For example, let's start a new VM in our default network.
vb.management_network_autostart = false So no new network is created.
vb.management_network_name = default Connect the VM network interface to the network default.
Vagrant.configure("2") do |config|
  # The Vagrant-box to use (operating system image) - an ubuntu24.0 here.
  config.vm.box = "cloud-image/ubuntu-24.04"

  # Configurations for the Virtual server:
  config.vm.provider "libvirt" do |vb|

    # Disk 50 Gb
    vb.machine_virtual_size = 50

    # Memory 8Gb RAM
    vb.memory = "8192"

    # 4 cores/cpus
    vb.cpus = 4

    # Nested virtualization - yes (virtualization inside virtualization)
    vb.nested = true

    # We need to care this: host-passtrhough -- Copy our CPU Configurations
    vb.cpu_mode = "host-passthrough"

    # Do not create any network automatically
    vb.management_network_autostart = false

    # Use specific existing network
    vb.management_network_name = "default"

    # Keep the network after exiting. By default, it will be removed
    vb.management_network_keep = true
  end
end
After vagrant up, we can see that we've got a dhcp-lease in our default interface corresponding to our server: