
Openstack: Some first steps
This article is a "remake" of an old one, adapted to this new openstack deployment using terraform.
Yesterday I published an article about deploying a local Openstack infrastructure using OpenTofu/Terraform and Libvirt. Howerver, once Openstack is Up and Running we need to do something with it.

This article will introduce the first steps we might need to do something useful with Openstack. Today, a non-admin user will create some virtual servers connected to the network with some features in terms of vCPUS, RAM and Hard disk size. We we’ll connect them using ssh.
What are the steps I’ll folow?
- Local installation of Openstack CLI — As admin (and of course as user) I want to type commands in the command line (Yes, there is a working console… but I feel well typing commands).
- Add a couple images to Glance — If I want to deploy a virtual server, I need to deploy one or more cloud-images in my Openstack which can be used to create new virtual servers. Basically, Glance is the component which registers, stores and retrieves Virtual Servers images.
- Add “Flavors” — Which are definitions of the capacities a Virtual Server will provide. For a flavor we define its name, the disk size, the RAM size, the number of virtual CPUs we need for the flavor, etc.
- Create Networks — This is important, when we create a new Virtual Server we have to connect it to the internet, to a local network, etc. If there are no networks, the server could be isolated and for sure, we won’t be able to connect/login it.
- Create/Manage users — It is interesting to have several users. At least one non-admin user.
- Create servers — Finally, we we’ll create some servers with our non-admin user. In order to do this, the user will need a Keypair and a security group.
Local Openstack CLI tools installation
Software installation
These tools require python3, virtualenv and pip to get installed:
# Create the Virtual environment to install openstack client cli tools
virtualenv ~/.venv/openstack

# activate the virtual environment
source ~/.venv/openstack/bin/activate

# Upgrade pip
pip install -U pip

# Install the clients.
pip install python-openstackclient
Configure environment variables
These openstack cli tools need some environment variables to work. We can download them from the Openstack dashboard login with the user admin and its password.
If you installed Openstack using kolla-ansible, the admin password can be found this way in the passwords.yml file:
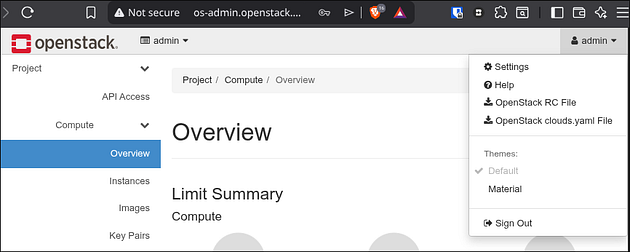
awk '$1 ~ /keystone_admin_password/ {print $2}' /etc/kolla/passwords.ymlSo, login in http://os-admin.openstack.mine — in the top right we click on “admin” and click in “openstack RC File” to download our variables file:
It is should be something like this (the original one “reads” the admin password from the keyboard, but in this case, I will use the awk onliner above — I name this file as keystone-rc-admin:
#!/usr/bin/env bash
# To use an OpenStack cloud you need to authenticate against the Identity
# service named keystone, which returns a **Token** and **Service Catalog**.
# The catalog contains the endpoints for all services the user/tenant has
# access to - such as Compute, Image Service, Identity, Object Storage, Block
# Storage, and Networking (code-named nova, glance, keystone, swift,
# cinder, and neutron).
#
# *NOTE*: Using the 3 *Identity API* does not necessarily mean any other
# OpenStack API is version 3. For example, your cloud provider may implement
# Image API v1.1, Block Storage API v2, and Compute API v2.0. OS_AUTH_URL is
# only for the Identity API served through keystone.
export OS_AUTH_URL=http://os-admin.openstack.mine:5000
# With the addition of Keystone we have standardized on the term **project**
# as the entity that owns the resources.
export OS_PROJECT_ID=30082b34457f419b8695a5c1da74662b
export OS_PROJECT_NAME="admin"
export OS_USER_DOMAIN_NAME="Default"
if [ -z "$OS_USER_DOMAIN_NAME" ]; then unset OS_USER_DOMAIN_NAME; fi
export OS_PROJECT_DOMAIN_ID="default"
if [ -z "$OS_PROJECT_DOMAIN_ID" ]; then unset OS_PROJECT_DOMAIN_ID; fi
# unset v2.0 items in case set
unset OS_TENANT_ID
unset OS_TENANT_NAME
# In addition to the owning entity (tenant), OpenStack stores the entity
# performing the action as the **user**.
export OS_USERNAME="admin"
# With Keystone you pass the keystone password.
# echo "Please enter your OpenStack Password for project $OS_PROJECT_NAME as user $OS_USERNAME: "
# read -sr OS_PASSWORD_INPUT
# export OS_PASSWORD=$OS_PASSWORD_INPUT
OS_PASSWORD=$(awk '$1 ~ /keystone_admin_password/ {print $2}' /etc/kolla/passwords.yml)
# If your configuration has multiple regions, we set that information here.
# OS_REGION_NAME is optional and only valid in certain environments.
export OS_REGION_NAME="corporario"
# Don't leave a blank variable, unset it if it was empty
if [ -z "$OS_REGION_NAME" ]; then unset OS_REGION_NAME; fi
export OS_INTERFACE=public
export OS_IDENTITY_API_VERSION=3
Test it!
Let me introduce the concept of keystone — It is the authentication and authorization service in Openstack. And all those variables above are (roughly) to identify yourself with keystone. To check that openstack-cli is working and that the variables are well defined, we could issue a token from keystone.
# Activate our Openstack-cli virtual environment
source ~/.venv/openstack/bin/activate

# load the variables we need to start working
source ./keystone-rc-admin

# Issue one token from keystone.
openstack token issue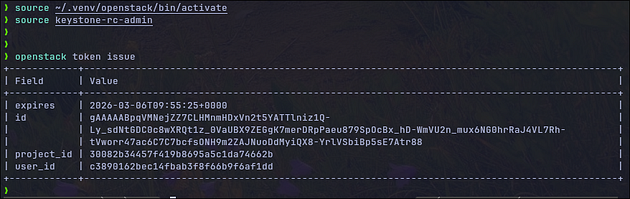
It works!!
Add images to Glance
Glance is the image repository of Openstack. We need images to instanciate new virtual servers.
Let’s download 2 different images — One to make simple tests (cirros image) and an Ubuntu 24.04.
# Download cirros img ~21Mb size
wget -O /tmp/cirros-6.3.0.img https://download.cirros-cloud.net/0.6.3/cirros-0.6.3-x86_64-disk.img

# Download Ubuntu 24.04 ~600Mb size
wget -O /tmp/ubuntu-noble-24.04.img https://cloud-images.ubuntu.com/noble/current/noble-server-cloudimg-amd64.img
Once we’ve locally downloaded them, we upload them to openstack:
# Upload cirros - This image is very small. It needs few RAM Mb, and small HD
# suffice to run servers based on this image.
openstack image create "cirros" \
--file /tmp/cirros-6.3.0.img \
--disk-format qcow2 --container-format bare \
--public
# Upload Ubuntu image - It won't fit everywhere
# --- It will require 20Gb of Hd (--min-disk)
# --- 2Gb of RAM (2*1024Mb)
openstack image create "ubuntu-24.04" \
--file /tmp/ubuntu-noble-24.04.img \
--disk-format qcow2 --container-format bare \
--min-disk 20 \
--min-ram $((1024*2)) \
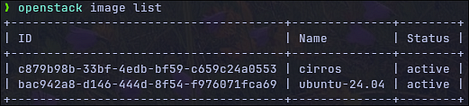
--publicTo check the images, we can run openstack image list`:
Cheatsheet commands to Glance
# Getting help
openstack help image

# List images:
openstack image list

# Create images (openstack help image create):
openstack image create <name> \
--file <local_file_image> \
--disk-format qcow2 --container-format bare \
[--public \]
[--min-disk <n_in_Gb> \]
[--min-ram <n_in_Mb> \]

# Show details from an image
openstack image show <id_or_name>

# Delete an image
openstack image delete <id_or_name>

# Save a local copy of an image
openstack image save --file local_copy.img <id_or_name>
Add Flavors
The flavors define the Hardware configuration of a virtual machine in terms of vCPUS, RAM and Disk. By default there are none, so, we are going to create 3 “rather small” flavors.
- tiny — 1vCPU, 1Gb RAM, 10Gb Hd
- small — 1vCPU, 2Gb RAM, 20Gb Hd
- medium — 2vCPU, 4Gb RAM, 40Gb Hd
openstack flavor create --ram $((1*1024)) \
--disk 10 --vcpus 1 --public tiny

openstack flavor create --ram $((2*1024)) \
--disk 20 --vcpus 1 --public small

openstack flavor create --ram $((4*1024)) \
--disk 40 --vcpus 2 --public medium
We can list the flavors openstack flavor list -

Cheatsheet commands to flavors
# Getting help
openstack help flavor

# Create flavors: openstack help flavor create
openstack flavor create --ram $((1*1024)) \
--disk 10 --vcpus 1 --public tiny

# Listing of flavors
openstack flavor list

# Show details of a flavor
openstack flavor show <flavor_name_or_id>

# Delete a flavor
openstack flavor delete <flavor_name_or_id>
Create networks and routers
This is the complicated part. A lot of long articles, tutorials, etc. should be written about networking in Openstack (and in kubernetes and everywhere). So, we are not going to deep here.
In this part we have to create the networks and a router to route traffic from VMs to the internet, however, I need to make an introductory part point to prepare the networks to be able to properly run everything. Sorry for that.
Prepare host routers (not openstack part, but much needed)
Before we start, I want to remember the architecture of our openstack deployment:
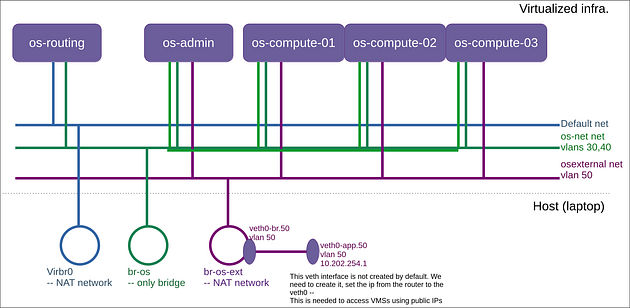
The rest of this point describes how to prepare the Host (laptop) to be able to deal with tagged traffic (vlans). If we hadn’t deployed things with vlans we wouldn’t need this part.
So, in order to let our Openstack servers and our os-routing server communicate among them, we need ensure that the bridge br-os is able to filter vlan traffic. We will also need this vlan-filtering in our br-os-ext router. And, I will need to make all the traffic in the “violet” network to be tagged.
Basically, I need 2 scripts. The first one to be run before starting the VMs:
# Run this one before the VMs start

# Create the bridge for the bridged "osnet" Network
sudo ip link add br-os type bridge


# Let br-os and br-os-ext be aware of vlans
sudo ip link add br-os type bridge vlan_filtering 1
sudo ip link add br-os-ext type bridge vlan_filtering 1
sudo ip link set br-os up
sudo ip link set br-os-ext up

# Ensure the openstack networks have started.
virsh net-start os-external
virsh net-start osnet

# Add a route for the 172.27.30.0/24 -- So I can connect the servers.
sudo ip route add 172.27.30.0/24 via 192.168.122.246
The second script has to be run when our Openstack servers (os-admin and compute-x) are running.
# In
# Create a veth (virtual ethernet)
sudo ip link add veth0-br type veth peer name veth0-app

# tag it with vlan50
sudo ip link add link veth0-app name veth0-app.50 type vlan id 50

# Connect veth to the br-os-ext bridge - Tag with vlan50
sudo brctl addif br-os-ext veth0-br
sudo bridge vlan add vid 50 dev veth0-br

sudo ip link set veth0-br up
sudo ip link set veth0-app up
sudo ip link set veth0-app.50 up

# Remove router IP from br-os-ext and put it in the veth0-app.50
sudo ip addr del 10.202.254.1/24 dev br-os-ext
sudo ip addr add 10.202.254.1/24 dev veth0-app.50

# Tag vlan for all the bridges where the Openstack VMs are connected
# to the server in br-os-ext.
for a in $(sudo ip a | awk '/vnet.* br-os-ext / { print gensub(":","","g",$2) }'); do
  sudo bridge vlan add vid 50 dev "$a"
done
sudo bridge vlan add vid 50 dev veth0-br
Creating the Openstack networks
We’ll create 2 types of networks:
- Internal — Which will be used for communications between all the virtual servers and the virtual routers, virtual dhcp servers, etc.
- External — Connected to the internet. This will provide access outside the openstack environment to the virtual servers (i.e. Internet).
After creating the networks, we have to create a virtual router connecting both networks. This way, servers connected to the internal network can connect to the internet.
# Create the internal network - A shared (--share) one usable for everybody.
openstack network create  --share internal

# One network must have at least one subnet to be usable.
openstack subnet create --network internal \
--allocation-pool start=192.168.192.3,end=192.168.192.254 \
--dns-nameserver 8.8.8.8 --gateway 192.168.192.1 --dhcp \
--subnet-range 192.168.192.0/24 sub-int-net# Public network creation:
#   --external - means it is external
openstack network create --external \
--provider-network-type flat \
--provider-physical-network physnet1 ext-net

# Create the subnet -
openstack subnet create --network ext-net \
--allocation-pool start=10.202.254.16,end=10.202.254.254 \
--dns-nameserver 8.8.8.8 --gateway 10.202.254.1 \
--subnet-range 10.202.254.0/24 sub-ext-net
Router creation
We need to connect the external network with the internal one, so the outbound traffic in the internal network can be routed to the external network which has internet connection.
In order to create the router we need the following commands
# Create a router named rt-ext
openstack router create --centralized rt-ext
# Set the external gateway (gateway to the Internet) in the external netw
openstack router set rt-ext --external-gateway ext-net
# Add the subnet (the internal one)
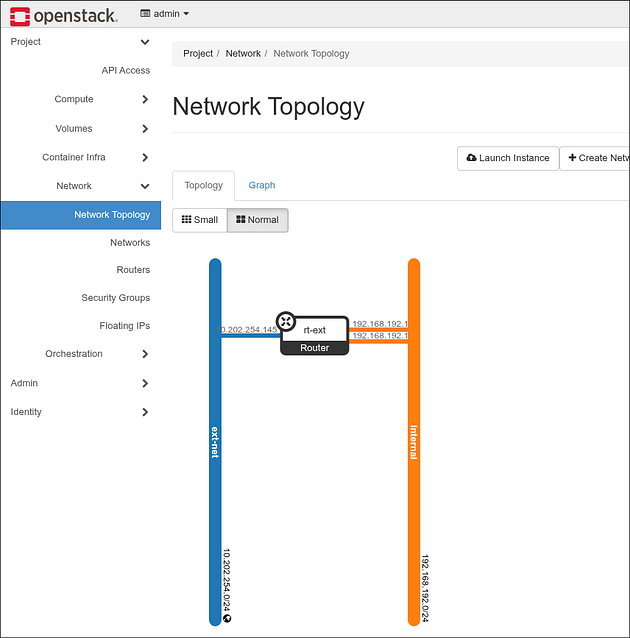
openstack router add subnet rt-ext sub-int-net From the dashboard we can see the Openstack network topology — 2 networks connected with one router:
Cheatsheet for networking
# Getting help
openstack help network
openstack help router
openstack help subnet

# Show the Networking Agents. Useful to understand the state
# of the different networking components.
openstack network agent list

# Get a list of the networks
openstack network list

# Get the details of a network
openstack network show <network_id_or_name>

# Delete a network
openstack network delete <network_id_or_name>

# Get a list of subnets
openstack subnet list

# Get a list of subnets belonging to a network
openstack subnet list --network <network_id_or_name>

# Show the details of a subnet
openstack subnet show <subnet_id_or_name>

# Delete a subnetwork
openstack subnet delete <subnet_id_or_name>

# List the routers
openstack router list

# Get the details of a router
openstack router show <router_id_or_name>

# Remove the connection of a subnet with a router
openstack router remove subnet <router> <subnet>

# Remove on router's gateway
openstack router unset --external-gateway <router>
Create user and project
Basically, in openstack we have the following idea: One user has one (or more) roles in one (or more) project.
There are some basic concepts here:
- Resources (vms, networks, routers, etc.) usually belong to projects.
- An user has one or more roles in one or more projects.
By default there are some roles predefined:
openstack role list
+----------------------------------+------------------+
| ID                               | Name             |
+----------------------------------+------------------+
| 085a93166ba34e78b37e4ca44daead9a | heat_stack_user  |
| 3e246a32a0e543fa9c95b006b85bf288 | reader           |
| 6750779c86964430b9106200a126ade2 | manager          |
| a172d6d5e0544496bcc3e8dc2b634d42 | admin            |
| e9e4edba65644da2ad6e80a216b774a1 | member           |
| f2f9731c3c544b6fb38d4c4aa10f0141 | heat_stack_owner |
| fe0363daa08f417e95f058b4fd0a8db2 | service          |
+----------------------------------+------------------+
We are going to define one project and an user.
# 1st we create a new project called jicg_project
openstack project create --domain default jicg_project

# 2nd we create a new user called jicg. In this case
# setting a password. This can be changed in the console.
openstack user create --password mysecretpassword jicg

# 3rd we assign the role "member" to the user jicg
# in the project jicg_project
openstack role add --user jicg --project jicg_project member
If we want to use this user with openstack-cli tools, we need to define new variables, and source ~/keystone-rc-jicg :
#!/usr/bin/env bash
export OS_AUTH_URL=http://os-admin.openstack.mine:5000
export OS_PROJECT_ID=7c2ad952915744409cc1c175b432a66b
export OS_PROJECT_NAME="jicg_project"
export OS_USER_DOMAIN_NAME="Default"
if [ -z "$OS_USER_DOMAIN_NAME" ]; then unset OS_USER_DOMAIN_NAME; fi
export OS_PROJECT_DOMAIN_ID="default"
if [ -z "$OS_PROJECT_DOMAIN_ID" ]; then unset OS_PROJECT_DOMAIN_ID; fi
# unset v2.0 items in case set
unset OS_TENANT_ID
unset OS_TENANT_NAME
export OS_USERNAME="jicg"
export OS_PASSWORD=mysecretpassword
export OS_REGION_NAME="corporario"
if [ -z "$OS_REGION_NAME" ]; then unset OS_REGION_NAME; fi
export OS_INTERFACE=public
export OS_IDENTITY_API_VERSION=3
From now on, we will use this non-admin user.
Create our first Virtual Server: Nova
In openstack, Nova is the compute service, responsible for creating, managing and deleting virtual machine instances.
- Takes images stored in Openstack Image Service (Glance).
- Applies the flavors (CPU, RAM, disk configuration)
- Manages the VMs lifecycle (start, stop, reboot, terminate)
There are a few steps we have to do before creating a new VM.
- Creating one or more security groups and Security rules: Since Openstack acts as a fully closed firewall, we need to define what to open. We can use the same security groups for all the VMs (although this is not recommended).
- Creating a keypair (public/private keys) so we can ssh in the VMs. We can use the same keypair for every VM.
- Allocating a Floating IP (public IP) to the project, so we can connect the VM from outside Openstack.
- Launch the 1st VM.
Create the security group and security rules
As I said previously, Openstack acts as a closed firewall and we need open some ports for inbound traffic. An important one is ssh port.
# Create a SG with the name demosecgroup
openstack security group create demosecgroup

# In the security group we add security rules.
# In this case we'll open port 22 and ping.

# Open tcp port 22 for everybody (network 0.0.0.0/0)
# for incoming traffic.
openstack security group rule create \
--remote-ip 0.0.0.0/0 \
--protocol tcp \
--dst-port 22 \
--ingress \
demosecgroup

# The same can be done for port HTTP (80) and HTTPS (443).

# This is to enable ping
openstack security group rule create \
--remote-ip 0.0.0.0/0 \
--protocol icmp \
--ingress \
demosecgroup
Create the keypairs
This will create a new private key so we can access our virtual machines using ssh. When creating a new VM, the public key will bi inserted.
openstack  keypair create demokeypair > demokeypair.pem

# The file needs to have some "restricted permissions"
chmod 400 demokeypair.pem
If you loose this file you won’t be able to access your virtual machines using this key.
Allocate a new public IP
We allocate a new public IP which is an IP in the external network. This IP will be assigned to the virtual server, so the traffic going to this public IP will be routed to the Virtual Machine and the other way around, all the outgoing traffic from the Virtual Machine will be routed using this public IP.
# ext-net is the name of the external network we created before
openstack floating ip create ext-net
In my case I got the IP 10.202.254.38 —

Create the 1st Virtual machine
We’ve been defining a lot of things to get here — To create a first virtual server.
# Create a server using all things we previously defined:
# - tiny flavor (1cpu, 1Gb RAM, 10G HD)
# - image cirros
# - demosecgroup (security group previously defined)
# - network internal (no internet connection)
# - key pair name demokeypair
openstack server create \
--flavor tiny \
--image cirros \
--security-group demosecgroup \
--network internal \
--key-name demokeypair \
cirrosvm
after a few seconds, we can see that the server we created has started:

So, now I will assign the IP to the cirrosvm server so we can access it using our public IP:
openstack server add floating ip cirrosvm 10.202.254.38I could access the virtual server using SSH with my private key:
ssh -i ./demokeypair.pem cirros@10.202.254.38
Last words
We created an Openstack cloud provider which can be used locally. It is not the easiest deployment. It deals with several compute nodes, vlans, routers, etc. — And it is usable. Well, I understand that we can’t deploy a large number of virtual servers, but we can do a lot of things with it.
Maybe I could write a second part. Or even get further. I will think about it.
Thank you for reading.