
Openstack: Some first steps (revisited with Tofu)
I wrote an article regarding some initial configuration of Openstack. The very few steps required:

I strongly recommend reading that article in order to understand. I would also recommend reading the article I wrote about installing Openstack locally using Terraform/OpenTofu.

I am going to explain now how can I configure the newly installed Openstack using OpenTofu (Terraform).
As I usually type tofu and terraform, I've created my alias for terraform. Yes, I know, it is clearer if I get used to type tofu, but I got tired of repeating the same command once and again. So, the alias:
alias terraform=tofuSo, what steps will I follow?
- Review the network configuration after my Openstack installation - There are some limitations in a default configuration of Linux, so I created a couple of scripts to make the Openstack networking properly run.
- I'll add a couple images to Glance, so I can create later new Virtual Servers.
- I'll add a few "Flavors", so I can tell my future Virtual Servers how much RAM, vCPUs and disk they can use.
- I'll create a couple of Networks, for sure my future Virtual machines will love to be accessed and used. They will be happy to connect to internet and watch interesting youtube videos.
- I'll create a new user. Yes, it is interesting doing things as an admin user, but I'd better create a new non admin user. Simply for security reasons.
- Finally, as non admin user, I'll show how to create a new Virtual Machines.
Openstack Provider for Terraform/OpenTofu
To configure the driver we need to define the following:
# Define required providers
terraform {
  required_version = ">= 0.14.0"
  required_providers {
    openstack = {
      source  = "terraform-provider-openstack/openstack"
      version = "~> 1.53.0"
    }
  }
}
and run;
terraform initThe configuration part goes like this:
# Configure the OpenStack Provider
# Not needed if the environment variables are defined before running
# "tofu apply|destroy|state xx"
provider "openstack" {
  user_name   = "admin"
  tenant_name = "admin"
  password    = "xxxx"
  auth_url    = "http://os-admin.openstack.mine:5000/v3"
  region      = "corporario"
}
However, in Openstack, one standard way to configure this is using environment variables - If we use those environment variables, we can skip that configuration for the Openstack provider.
export OS_USERNAME="admin"
export OS_PROJECT_NAME="admin"
export OS_AUTH_URL=http://os-admin.openstack.mine:5000
export OS_REGION_NAME="corporario"
export OS_PROJECT_DOMAIN_ID="default"
export OS_INTERFACE=public
export OS_IDENTITY_API_VERSION=3

# As I deployed Openstack using kolla-ansible, I can get the admin password
# from the "password.yml" file.
export OS_PASSWORD=$(awk '$1 ~ /keystone_admin_password/ {print $2}' /etc/kolla/passwords.yml)
Así que sólo tengo que ejecutarlo con source:
source ~/keystone-rc-admin.shAdd Images to glance
Manual Image downloads
Terraform is not designed for running local commands. We'll later need download a couple images (something like blueprint templates to create new virtual servers) and upload them to Openstack. Some of these images are compressed and we need to uncompress them before uploading them to openstack.
So, Lets download and uncompress those images - I'll do it in my /var/lib/libvirt/base-image-pool/ directory.
cd /var/lib/libvirt/base-image-pool/

# Download cirros
wget https://download.cirros-cloud.net/0.6.3/cirros-0.6.3-x86_64-disk.img

# Download Ubuntu-noble (24.04)
wget https://cloud-images.ubuntu.com/noble/current/noble-server-cloudimg-amd64.img

# Download fedora coreos
wget https://builds.coreos.fedoraproject.org/prod/streams/stable/builds/43.20260217.3.1/x86_64/fedora-coreos-43.20260217.3.1-qemu.x86_64.qcow2.xz

# I need to descompress before uploading to Openstack.
unxz fedora-coreos-43.20260217.3.1-qemu.x86_64.qcow2.xz
We could upload the images from internet to Glance without local downloading, yes! (except for the Fedora-coreos...xz, compressed images are not supported by Glance). However, destroying and creating images would waste a bit too much bandwidth.
Upload Image to Glance
In order to upload a new image to glance, I can add the following hclcode:
# basic example - Not used later.

resource "openstack_images_image_v2" "cirros" {
  name             = "cirros"

  local_file_path  = "/var/lib/libvirt/base-image-pool/cirros-0.6.3-x86_64-disk.img"
  # alternative to local_file_path... but download from internet
  # image_source_url = "https://download.cirros-cloud.net/0.6.3/cirros-0.6.3-x86_64-disk.img"

  container_format = "bare"
  disk_format      = "qcow2"
  visibility       = "public"

  properties = {
    key = "value"
  }
}
... Three times. Or I could define a new variable with type map and iterate over the elements:
# List of images to upload -

variable "images" {
   description = "List of images to upload with some of their properties"
   type = map(object({
      # The filename to use as image.
      filename = string

      # The size of the Hard disk to use (in Gigabytes)
      hd = number

      # The amount of RAM to use (in Megabytes).
      ram = number
   }))

   default = {
      cirros = {
         filename = "/var/lib/libvirt/base-image-pool/cirros-0.6.3-x86_64-disk.img"
         hd = 1
         ram  = 512
      }
      ubuntu-2404 = {
         filename = "/var/lib/libvirt/base-image-pool/noble-server-cloudimg-amd64.img"
         hd = 10
         ram  = 2048
      }
      fedoracore-43 = {
         filename = "//var/lib/libvirt/base-image-pool/fedora-coreos-43.20260217.3.1-qemu.x86_64.qcow2"
         hd = 30
         ram  = 4096
      }
   }
}

resource "openstack_images_image_v2" "images" {
  for_each = var.images
  name             = each.key
  local_file_path  = each.value.filename
  container_format = "bare"
  disk_format      = "qcow2"
  visibility       = "public"

  /* The following are optional */
  min_disk_gb = each.value.hd
  min_ram_mb  = each.value.ram

  /* Whatever property you want to know / add (optional) */
  properties = {
    jicg = "Please visit https://jicg.eu"
  }
}
These are equivalent to openstack commands:
# Equivalent 1 command example of the 3 VM creation above.
openstack image create "ubuntu-24.04-removeme" \
--file /var/lib/libvirt/base-image-pool/cirros-0.6.3-x86_64-disk.img \
--disk-format qcow2 --container-format bare \
--min-disk 10 \
--min-ram 2049 \
--property jicg='Please visit https://jicg.eu' \
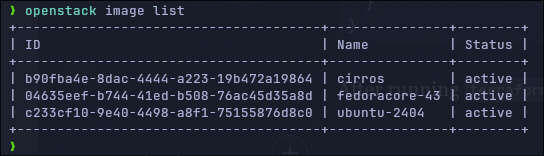
--publicAfter running terraform apply, we'll have the images there:
Add Flavors
I will add 3 flavors:
tiny — 1vCPU, 1Gb RAM, 10Gb Hd
small — 1vCPU, 2Gb RAM, 20Gb Hd
medium — 2vCPU, 4Gb RAM, 40Gb Hd
# List of flavors to be created
variable "flavors" {
  description = "A list of flavors to be created"
  type = map(object({
    ram   = number
    vcpus = number
    disk  = number
  }))

  default = {
    tiny = {
      ram   = 1024
      vcpus = 1
      disk  = 10
    }
    small = {
      ram   = 2048
      vcpus = 1
      disk  = 20
    }
    medium = {
      ram   = 4096
      vcpus = 2
      disk  = 40
    }
  }
}

# Create the flavors. Iterate in the flavors with the "for_each var.flavors"
resource "openstack_compute_flavor_v2" "flavors" {
  for_each = var.flavors

  name  = each.key
  ram   = each.value.ram
  vcpus = each.value.vcpus
  disk  = each.value.disk

  # Optional: public visibility
  is_public = true
}
Una vez definidos, podemos aplicarlos con tofu apply.
Este código es equivalente a las llamadas a Openstack:
openstack flavor create --ram 1024 \
--disk 10 --vcpus 1 --public tiny
....
Una vez hemos definido el fichero, podemos ejecutar:
tofu applyY cuando teremine, podemos comprobar los flavors con openstack flavor list .

Add Networking.
As well as in the previous article, we'll create 2 types of networks:
- Internal - A local network which will be available for everybody, but it will be only used for internal communication between Virtual Servers.
- External - Connected to the internet so our local servers can reach out.
Internal network
# Create an internal Network -- A shared network for everybody
resource "openstack_networking_network_v2" "internal" {
  name           = "internal"
  admin_state_up = "true"
  shared = "true"
}

# Create a Subnetwork in our shared network
resource "openstack_networking_subnet_v2" "subnet_int_net" {
  name       = "subnet-int-net"
  network_id = openstack_networking_network_v2.internal.id
  cidr       = "192.168.192.0/24"
  ip_version = 4
  gateway_ip = "192.168.192.1"
  enable_dhcp = true
  dns_nameservers = [
        "8.8.8.8",
  ]
  allocation_pool {
        end   = "192.168.192.254"
        start = "192.168.192.3"
  }
}
Which equivalent for Openstack commands are:
openstack network create  --share internal

# One network must have at least one subnet to be usable.
openstack subnet create --network subnet-int-net \
--allocation-pool start=192.168.192.3,end=192.168.192.254 \
--dns-nameserver 8.8.8.8 --gateway 192.168.192.1 --dhcp \
--subnet-range 192.168.192.0/24 sub-int-net
External network
# Create an internal Network -- A shared network for everybody
resource "openstack_networking_network_v2" "ext_net" {
  name           = "ext-net"
  admin_state_up = "true"
  external = "true"
  segments {
    network_type     = "flat"
    physical_network = "physnet1"
    segmentation_id  = 0
  }
}

# Create a Subnetwork in our shared network
resource "openstack_networking_subnet_v2" "sub_ext_net" {
  name       = "sub-ext-net"
  network_id = openstack_networking_network_v2.ext_net.id
  cidr       = "10.202.254.0/24"
  ip_version = 4
  gateway_ip = "10.202.254.1"
  enable_dhcp = true
  dns_nameservers = ["8.8.8.8"]
  allocation_pool {
        end   = "10.202.254.254"
        start = "10.202.254.16"
  }
}
And the openstack-cli equivalent would be:
openstack network create --external \
--provider-network-type flat \
--provider-physical-network physnet1 ext-net

# Create the subnet -
openstack subnet create --network ext-net \
--allocation-pool start=10.202.254.16,end=10.202.254.254 \
--dns-nameserver 8.8.8.8 --gateway 10.202.254.1 \
--subnet-range 10.202.254.0/24 sub-ext-net
Once defined both networks, we have to run the magic command again.
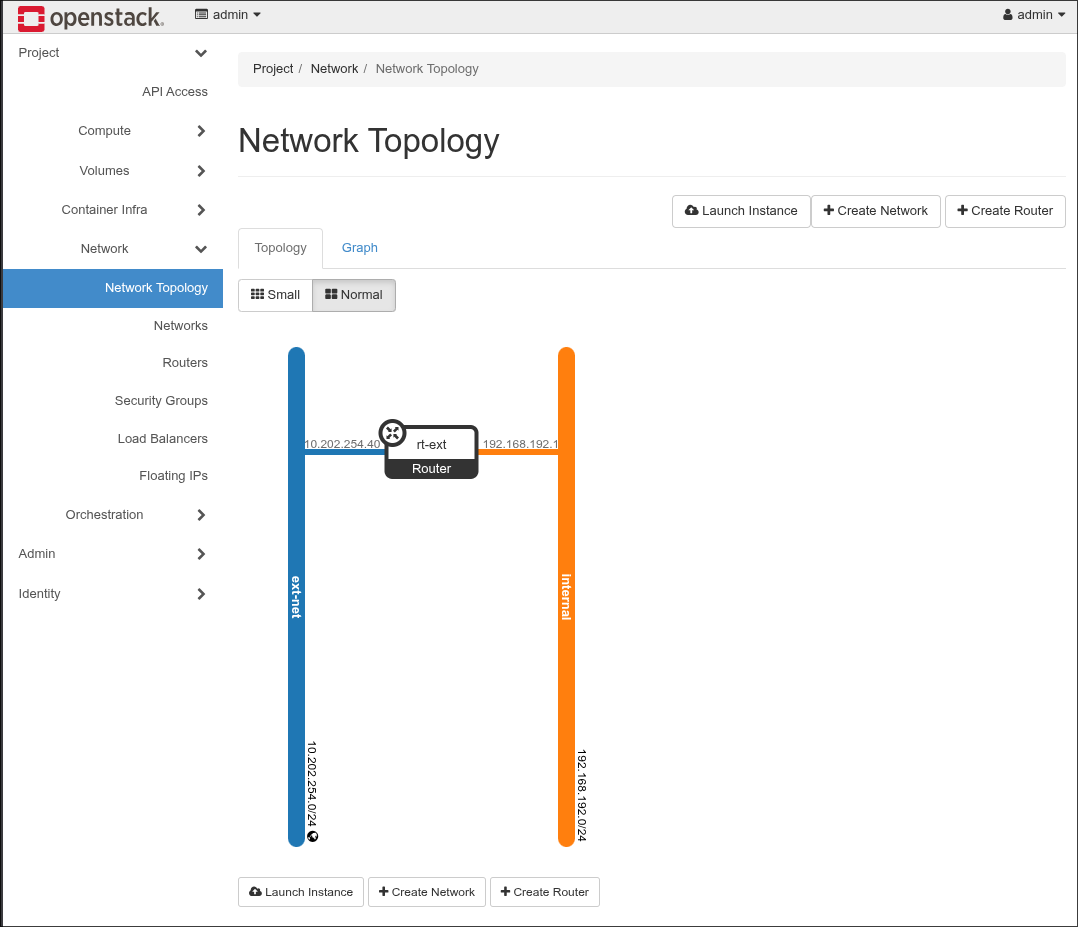
tofu applyAnd you will see with the command openstack network list that there are 2 new net networs (ext-net and internal) - Don't care about the 3rd one in the picture, at this stage we can consider it as "fully internal to openstack".

Router Creation
Once we have the external and internal networks, let's connect both of them with one router, so the internal network can reach the Internet.
There are 2 steps here: The first one creating the router and the second one connecting the internal network to the router:
# Create a router with the gateway placed in the external network.
resource "openstack_networking_router_v2" "rt_ext" {
  name = "rt-ext"
  external_network_id = openstack_networking_network_v2.ext_net.id
}

# Router interface to subnet
resource "openstack_networking_router_interface_v2" "rt_ext_interface" {
  router_id = openstack_networking_router_v2.rt_ext.id
  subnet_id = openstack_networking_subnet_v2.subnet_int_net.id
}
The equivalent commands in Openstack-CLI are:
# Create a router named rt-ext
openstack router create --centralized rt-ext

# Set the external gateway (gateway to the Internet) in the external netw
openstack router set rt-ext --external-gateway  ext-net

# Add the subnet (the internal one)
openstack router add subnet rt-ext sub-int-net
And I have a router connected to two networks. I can get a visual representation of that in Openstack dashboard (with the user admin):
Create User and Project
A last step is to create a non admin user, with its project and add it to the "member" group. The member role is already created by openstack in the installation process. We should assign the role "member" to the newly created user in the newly created project.
In order to get the data from the member role (what Openstack knows about it), we define the data block
data "openstack_identity_role_v3" "member" {
    name = "member"
}

# Use later with openstack_identity_role_v3.member_id
Here it is the full creation of the user, the project and the role assignment - I've set the user_name, the project_name and the user_password as variables. You can override them using environment variables TF_VAR_user_password, TF_VAR_project_name and TF_VAR_user_name.
# Set variables
variable "user_password" {
  description = "Password of the user user"
  type        = string
  sensitive   = true

  # Remove the following line and
  # 'export TF_VAR_user_password="mysecretpassword"' instead
  default = "mysecretpassword"
}

variable "project_name" {
  type = string
  default = "jicg-project"
}

variable "user_name" {
  type = string
  default = "jicg"
}


# openstack pproject create --domain default user_project
resource "openstack_identity_project_v3" "user_project" {
  name        = var.project_name
  description = "A new user project"
}

# openstack user create --password misecretpassword user
resource "openstack_identity_user_v3" "user" {
  default_project_id = openstack_identity_project_v3.user_project.id
  name               = var.user_name
  description        = "A non admin user to deploy things"

  password = var.user_password
}

# Query the role "member" - So I can access it using
# data.openstack_identity_role_v3.member...
# Openstack cli, this hcl snippet would translate to:
#     openstack role show member
data "openstack_identity_role_v3" "member" {
    name = "member"
}

# Openstack role assignment list
resource "openstack_identity_role_assignment_v3" "role_assignment_1" {
  user_id    = openstack_identity_user_v3.user.id
  project_id = openstack_identity_project_v3.user_project.id
  role_id    = data.openstack_identity_role_v3.member.id
}
This basically does what openstack cli would do if you run:
openstack project create --domain default jicg_project

openstack user create --password mysecretpassword jicg

openstack role add --user jicg --project jicg_project member