
Provisioning Infrastructure with Terraform and Libvirt for OpenStack Deployment
This article gets deeper building a complete virtual infrastructure using OpenTofu/Terraform and libvirt, which will serve as the foundation for a full OpenStack deployment via Kolla-Ansible. By the end, you'll have 5 running VMs — one router, one controller, and three compute nodes — with OpenStack up and accessible.
So, the goal of this article is deploying some interesting local architecture with OpenTofu/Terraform and install Openstack on that local virtual infrastructure using kolla-ansible.
The article will be structured like this:
- Some hints before you begin.
- Architecture overview for the deployment.
- Deploying the Networks (OpenTofu)
- Setting up DNS names (or
/etc/hostsif it fits better for you). - Deploying the Servers (OpenTofu)
- Installation of Openstack with ansible-kola
This article won't show how to do anything with Openstack. I'll drop another introductory article soon.
Part 1. Hints Before you begin
I'll consider the basics exposed in my previous introductory article for OpenTofu/Terraform on a libvirt provider:

I will also use, in order to be able to access the servers by name, a local DNS Server I which I have deployed for demos and articles:

All the configuration files can be found in the repository: https://github.com/jicarretero/deploy-openstack-tofu
Hardware used for the demo/article
This article and the demo has been implemented using a Laptop Intel i7, 20 Th
- Intel i7, 20 cpus
- 64 Gb Ram memory
- 4Tb nvme disk (of course we won't use that much).
Part 2. Architecture overview
Using OpenTofu we'll deploy this architecture, we'll install later install Openstack on the os-admin and os-compute nodes.
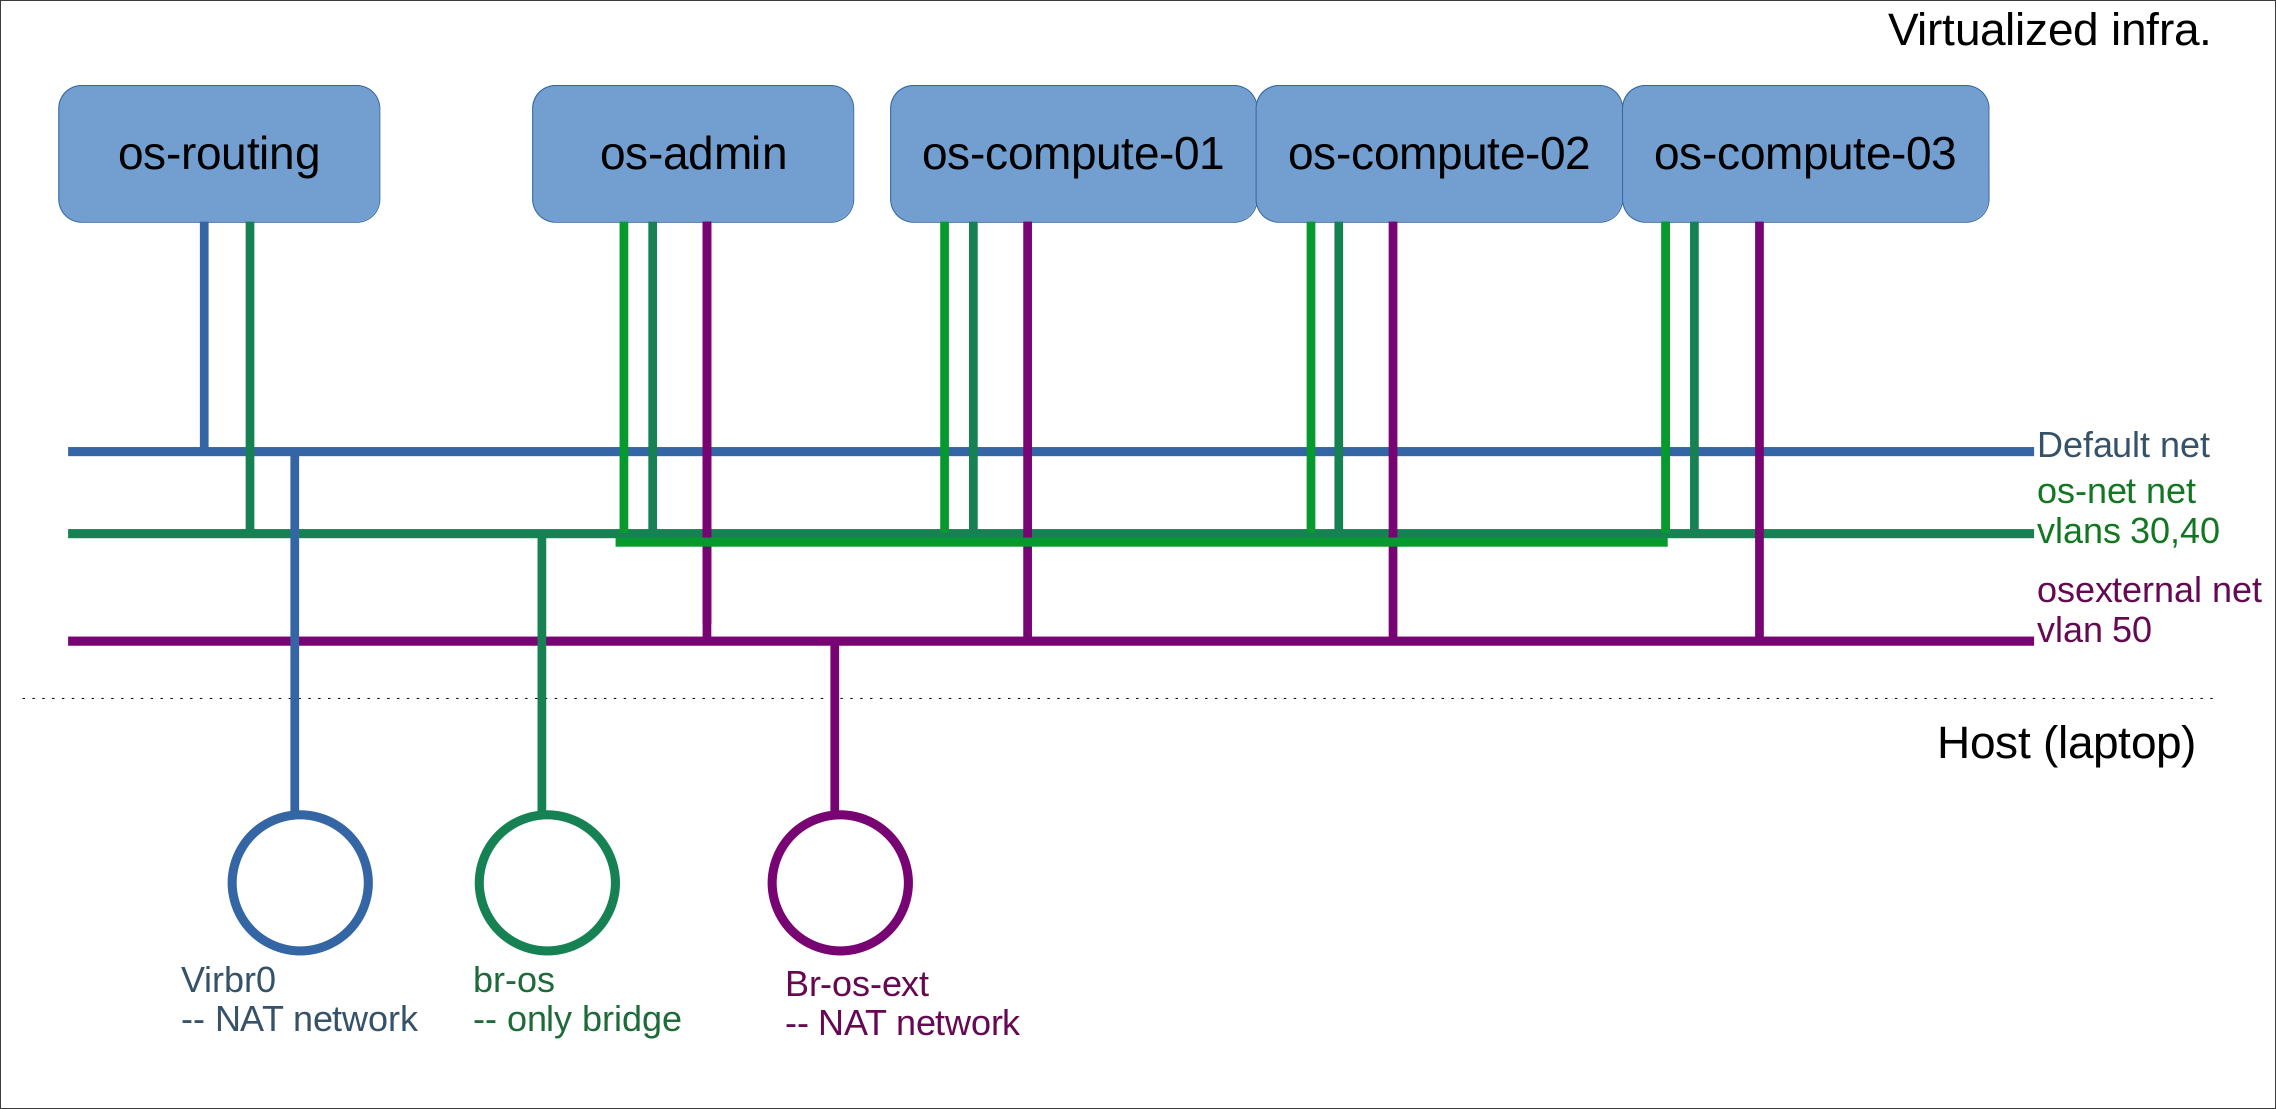
The features of the different virtual servers are described as follows.

The "os-routing" host
This host is connected to the default libvirt network. It is accesible from outside the network. It is also connected to the openstack servers using the vlan 30. It has a double fold purpose:
- Allow connections to Openstack APIs and Dashboard from outside the Openstack networks.
- Allow Openstack servers connect to the internet.
The Openstack servers hosts
These hosts are connected to vlan 30 in order to be able to access to the internet (updates, download things, etc) using os-routing host. They are connected in the same LAN to send and receive messages between them.
These hosts are also connected to vlan 40 so tunneled data from Openstack VMs can reach the servers and they can get their configurations, communicate between them, etc.
Last, these are also connected to vlan 50 which is connected to a different virtual bridge. This one is to connect the VMs to the internet using a public IP. Of course, in this case is simulated, but I will be able to connect the VMs in this Public IP.
Part 3. Deploying the Networks with OpenTofu
First, I have to create the networks osnet and os-external - The default network is already created by default in the installation of libvirt. Once the networks are created, I'll let it be there instead of letting any terraform destroy remove my network infrastructure. So, this is my configuration file for my networks:
terraform {
  required_version = ">= 1.0"
  required_providers {
    libvirt = {
      source  = "multani/libvirt"
      version = "0.6.3-1+4"
    }
  }
}

provider "libvirt" {
  uri = "qemu:///system"
}

# Create "osnet" network. Type bridge
resource "libvirt_network" "osnet" {
  name   = "osnet"
  mode   = "bridge"
  bridge = "br-os"
}

# Create "os-external" network. Type nat
resource "libvirt_network" "os-external" {
  name      = "os-external"
  mode      = "nat"
  bridge    = "br-os-ext"
  addresses = ["10.202.254.0/24"]
}
As always:
# Init terraform with the required providers:
terraform init

# Create the networks
terraform apply
In this case, terraform apply will create the Networks in libvirt, unfortunately I can't do everything here using OpenTofu in this case. There's a limitation in the configuration I can do. So, I need to do a couple things manually:
- Create bridge
br-osso I can attach bridged networks to it (br-os-ext will be created as the NAT network is created). - Set "vlan" awareness in both bridges.
# Create the bridge for the bridged "osnet" Network
sudo ip link add br-os type bridge

# Let br-os and br-os-ext be aware of vlans
sudo ip link add br-os type bridge vlan_filtering 1
sudo ip link add br-os-ext type bridge vlan_filtering 1
sudo ip link set br-os up
sudo ip link set br-os-ext up
Part 4. Setting up Names for the servers.
Option 1. Using DNS server
I strongly think that having a DNS is very useful. So, I created a new zone for this demo in my named server (consider visiting my article "Local DNS Server for Demos").
So, in /etc/named/named.conf.local I added a new zone:
....
zone "openstack.mine" {
    type master;
    file "/etc/named/zones/db.openstack.mine"; # zone file path
};
....
And I created the file /etc/named/zones/db.openstack.mine:
$TTL    604801
@       IN      SOA     services.openstack.mine. admin.openstack.mine. (
         2025112100     ; Serial
             604800     ; Refresh
              86400     ; Retry
            2419200     ; Expire
             604800     ; Negative Cache TTL
)

; name servers - NS records
    IN      NS      services

services.openstack.mine.          IN      A       192.168.3.253
admin.openstack.mine.             IN      A       192.168.3.253

; name servers - A records
os-routing              IN      A       172.27.30.1
os-admin                IN      A       172.27.30.2
os-compute-0            IN      A       172.27.30.20
os-compute-1            IN      A       172.27.30.21
os-compute-2            IN      A       172.27.30.22
Option 2: modify /etc/hosts
As a workaround, if you don't want to have these DNSs entries or a local DNS server, you can simply add in every virtual server and in the host laptop the entries in /etc/hosts the entries:
# Add these entries to every /etc/hosts if you don't have a dns
172.27.30.1      os-routing.openstack.mine
172.27.30.2      os-admin.openstack.mine
172.27.30.1      os-compute-0.openstack.mine
172.27.30.1      os-compute-1.openstack.mine
172.27.30.1      os-compute-2.openstack.mine
Part 5. Deploying the Servers (OpenTofu)
We'll be using Ubuntu 24.04 for this deployment, and, as I explained in my "OpenTofu (Terraform) and libvirt" article, I created a set of pools for my Virtual Servers deployment.
# Download Ubuntu 24.04 latest image. I do that to my "base-image-pool" directory.
sudo wget -O /data/libvirt/base-image-pool/ubuntu-24.04-base-x.qcow2 \
  https://cloud-images.ubuntu.com/noble/current/noble-server-cloudimg-amd64.img

# Refresh your pool, specially the newly downloaded image to the pool
virsh pool-refresh base-image-pool
OS-ROUTING Host
This host is, as previously described, a router from the "outside" of the Openstack cluster to the APIs and to the dashboard of Openstack. And it also serves for Openstack cluster servers to be able to access internet in order to download the packages and all the things it might need.
Its network definition will be (/etc/netplan/50-netpan) - It will have 2 network interfaces, one in default network and the other one in the bridged network with vlan 30.
network:
 version: 2
 renderer: networkd
 ethernets:
   ens3:
     dhcp4: true
   ens4:
     dhcp4: false
     dhcp6: false
     optional: true
 vlans:
   ens4.30:
     id: 30
     link: ens4
     addresses: [172.27.30.1/24]
     optional: true
The cloud-init for this server will install some useful packages and configure the server to NAT traffic from 172.27.30.0/24 (the openstack servers) to the default 192.168.122.1 ip. It does this by installing a new systemctl service.
It will also allows traffic to be forwarded, so the Openstack APIs can be reached.
This is done in the file cloud-init-routing.cfg:
#cloud-config
# vim: syntax=yaml
#
...
package_update: true
package_upgrade: true
packages:
  - qemu-guest-agent
  - curl
  - wget
  - tmux
  - jq
  - vlan
  - ripgrep
  - fzf
  - python3
  - python3-virtualenv
  - python3-pip
  - python3-dev
write_files:
  - path: /etc/systemd/system/krtroute.service
    content: |
      [Unit]
      Description=MASQUERADE FOR ROUTING

      [Service]
      Type=oneshot
      ExecStart=/usr/sbin/iptables -t nat -A POSTROUTING -s 172.27.30.0/24 -j MASQUERADE
      RemainAfterExit=yes
      TimeoutSec=0
      WorkingDirectory=/
      RestartSec=10

      [Install]
      WantedBy=multi-user.target
    permissions: '0644'
runcmd:
  - systemctl daemon-reload
  - systemctl enable krtroute.service
  - systemctl start krtroute.service
  - systemctl enable qemu-guest-agent
  - systemctl start qemu-guest-agent
  - sed -i 's/#net.ipv4.ip_forward=1/net.ipv4.ip_forward=1/g' /etc/sysctl.conf
  - sysctl -p
Other Openstack servers
The network configuration will be slightly different since they don`t have a network interface in the default network but they have 2 interfaces in the bridged osnet network, and an interface (without IP) in the nated os-external network - This network interface is only for "internet" networking in the VMs. Their netplan configuration is something like this:
network:
  version: 2
  ethernets:
    ens3:
      optional: true
    ens4:
      optional: true
    ens5:
      optional: true
  vlans:
    ens3.30:
      addresses: [172.27.30.${n_ip}/24]
      id: 30
      gateway4: 172.27.30.1
      link: ens3
      nameservers:
        addresses: [ 192.168.3.253 ]
      optional: true
    ens4.40:
      addresses: [172.27.40.${n_ip}/24]
      id: 40
      link: ens4
      optional: true
    ens5.50:
      id: 50
      link: ens5
      optional: true
where:
- n_ip = 2 for the os-admin server.
- n_ip = 20, 21, 22 ... for the os-compute servers.
In this case, you can see that the "nameservers" is set to 192.168.3.253 which is my local DNS installation. For sure you'll want to change that.
These servers install the same packages than the os-routing server. And they also configure IP forwarding. However, the os-admin server will initaliza a new physical volume and will add it a new volume group for cinder – We'll explain this later:
....
runcmd:
  - systemctl daemon-reload
  - systemctl enable qemu-guest-agent
  - systemctl start qemu-guest-agent
  - sed -i 's/#net.ipv4.ip_forward=1/net.ipv4.ip_forward=1/g' /etc/sysctl.conf
  - sysctl -p
%{ if is_admin }
  - pvcreate /dev/vdb
  - vgcreate cinder-volumes /dev/vdb
%{ endif }
...
differences between os-admin and compute nodes
- Compute nodes have 16Gb RAM and 250Gb SSD
- os-admin node have 12Gb RAM and 60Gb+300Gb SSD – The 300Gb ssd is for volume storage (that's pvcreate, and vgcreate).
Time to run it!
terraform init
terraform apply
Once the VMs are started, we can run virsh list to see the vms created (5 vms as expected) and the leases in the default network. In my case 192.168.122.246:
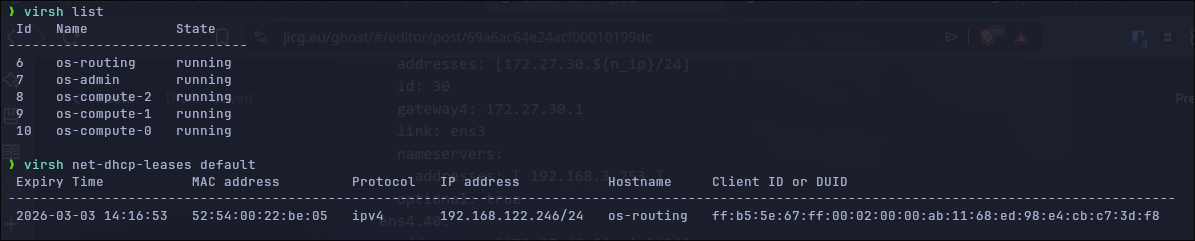
So, now, I have to route my traffic to 172.27.30.x through 192.168.122.246:
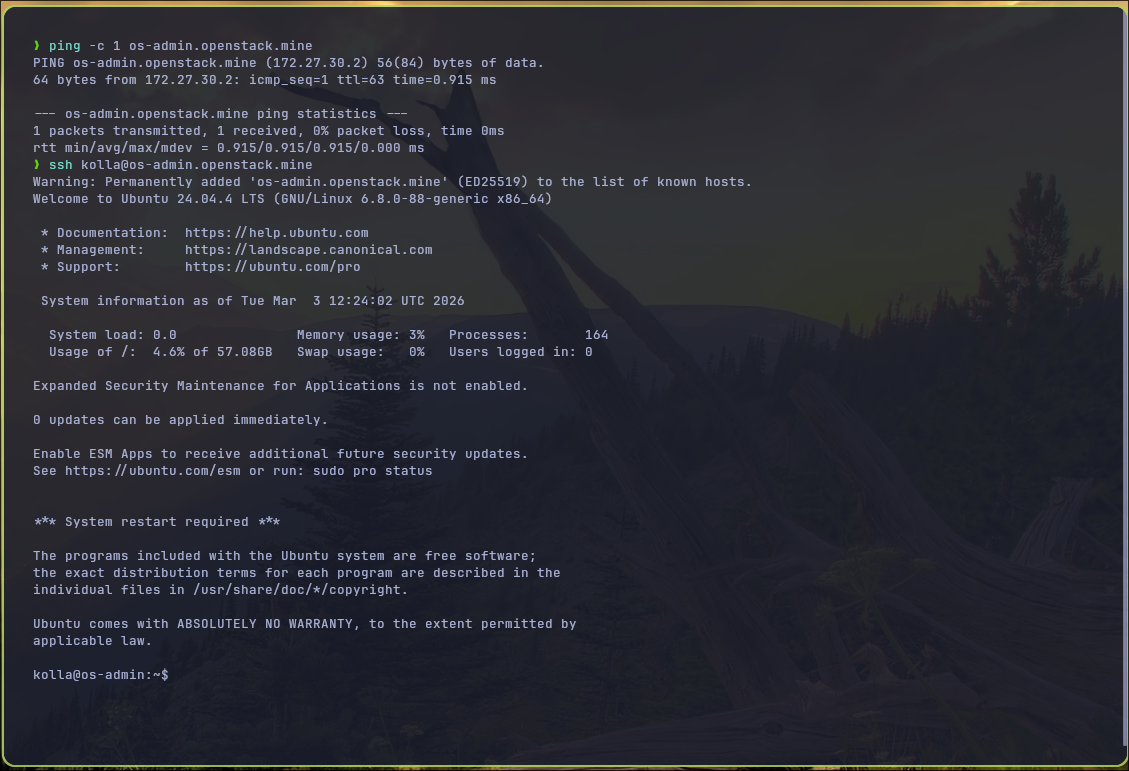
sudo ip route add 172.27.30.0/24 via 192.168.122.246The user I configured is named kolla – So, maybe I can ping and login to other servers.
Part 6. Install Openstack using Kolla-ansible
As a prerequisite we need python3 and virtual-env installed. So, I create my virtual-env
python3 -m venv ~/.venv/kolla-ansible
source ~/.venv/kolla-ansible/bin/activate

pip install -U pip

pip install kolla-ansible==20.3.0 ansible-core==2.18.0

## Create /etc/kolla and let the current user (jicg in my case) own it:
sudo mkdir -p /etc/kolla
sudo chown jicg:jicg /etc/kolla

## Install dependencies
kolla-ansible install-deps
In a new kolla folder, I will create some files, among them ansible.cfg:
[defaults]
host_key_checking=False
pipelining=True
forks=20
And multinode, my inventory file – Here are the first 40 lines (the most important ones), however, this file has more than 600 lines:
# These initial groups are the only groups required to be modified. The
# additional groups are for more control of the environment.
[control]
# These hostname must be resolvable from your deployment host
os-admin.openstack.mine ansible_user=kolla ansible_become=true

# The above can also be specified as follows:
#control[01:03]     ansible_user=kolla

# The network nodes are where your l3-agent and loadbalancers will run
# This can be the same as a host in the control group
[network]
os-admin.openstack.mine ansible_user=kolla ansible_become=true

[compute]
os-compute-0.openstack.mine ansible_user=kolla ansible_become=true
os-compute-1.openstack.mine ansible_user=kolla ansible_become=true
os-compute-2.openstack.mine ansible_user=kolla ansible_become=true

[monitoring]
os-admin.openstack.mine ansible_user=kolla ansible_become=true

# When compute nodes and control nodes use different interfaces,
# you need to comment out "api_interface" and other interfaces from the globals.yml
# and specify like below:
#compute01 neutron_external_interface=eth0 api_interface=em1 tunnel_interface=em1

[storage]
os-admin.openstack.mine ansible_user=kolla ansible_become=true

[deployment]
localhost       ansible_connection=local

[baremetal:children]
control
network
compute
storage
monitoring
....
Preliminary configurations generation.
Create the password:
# Copy the password template file to /etc/kolla
cp  ~/.venv/kolla-ansible/share/kolla-ansible/etc_examples/kolla/passwords.yml /etc/kolla

# Set new passwords in the template
kolla-genpwd
Create globals.yml configuration:
Copy and modify the configuration file (globals.yml), so the networks and components to be installed are the ones that we need.
cp ~/.venv/kolla-ansible/share/kolla-ansible/etc_examples/kolla/globals.yml /etc/kollaInstallation
Before continuing, I must admit that I had to do a "small" patch to make the installation "fluently" work. I added 3 lines at the end of the file ~/.venv/kolla-ansible/share/kolla-ansible/ansible/roles/prechecks/vars/main.yml – It simply complained in the "prechecks" that Archlinux is not supported... now it is. BTW I use Arch.
...
# jicg
  Archlinux:
    - "rolling"
Ok, the installation:
# Bootstrap servers -- ~3 minutes
kolla-ansible bootstrap-servers -i ./multinode

# Prechecks --  ~1 minute
kolla-ansible prechecks -i ./multinode


# Pull the images - It is specially recommended when upgrading too ~7 minutes
kolla-ansible pull -i multinode

# Finally... deploy -- ~11 minutes
kolla-ansible deploy -i ./multinode
I
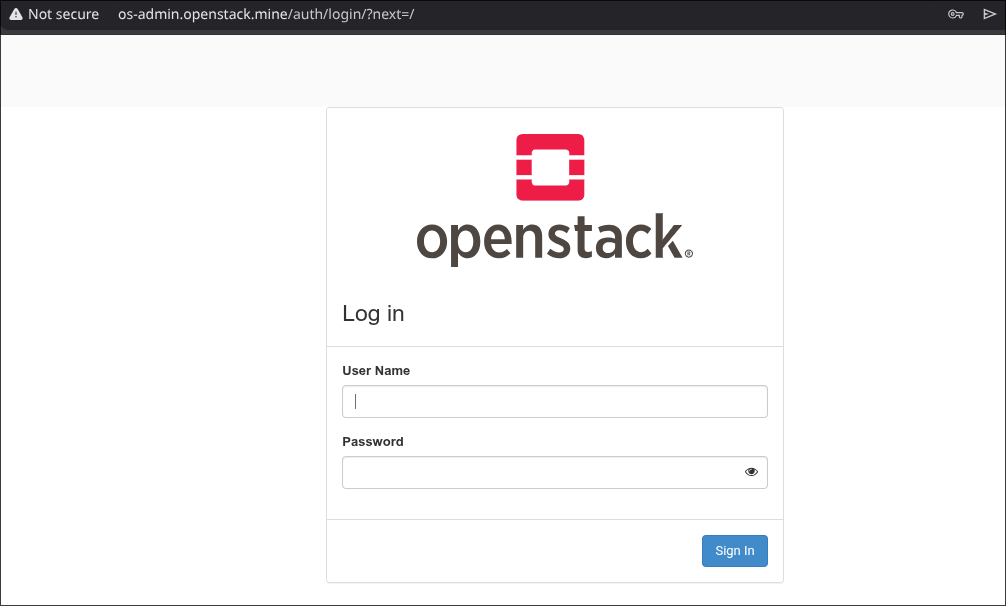
And that's it - I've got my Openstack up and running -
Using the command grep keystone_admin_password /etc/kolla/passwords.yml I can get the password for user admin:
In order to start working with Openstack, you can check the article here:
Conclusion
This article is intended to understand how to use more complex deployments using OpenTofu/Terraform. All the basics of HCL language are used in this article: Create Virtualized Network infrastructures, servers with different sizes and purposes and different configurations, adding different size and number of disks to each servers, etc.
And in another part, one the infrastructure is deployed, I showed how we could use tools based in ansible to deploy our own services. In this case, our own private cloud.
How can I use this Openstack private cloud deployment? - This will come soon in future articles.
Thanks for reading.